How to Tune Up a Bike at Home
By Cal WhitmoreUpdated 9 min read
The short answer
Work in a fixed order: clean it, run an M-check front to rear, then set the brakes, index the gears, measure chain wear and check bolt torques. Most of a tune-up is inspection rather than adjustment.
Key takeaways
- A tune-up is mostly inspection. Adjust only what the inspection tells you to.
- The M-check traces the bike in an M shape so nothing gets skipped, which is what checklists are for.
- Do the safety-critical items first: brakes, then anything structural. Gears can wait; brakes cannot.
- Know your limits. Hydraulic bleeds, wheel building and bearing work are reasonable things to pay for.
A tune-up sounds like a big job. In practice it is a systematic look at everything, followed by fixing the two or three things you find. The value is in the systematic part — problems get missed because nobody looked, not because they were hard to spot.
Set aside about an hour for a first pass. Once you know the bike it drops to twenty minutes.
Step 1: clean it first
Not for appearances. You cannot see a hairline crack, a frayed cable strand or a worn brake pad through road grime, and a clean drivetrain is the only way to judge chain and sprocket wear honestly. Full method in cleaning a bike.
Step 2: the M-check
The M-check is a route through the bike shaped like the letter M: front wheel up to the bars, down to the bottom bracket, up to the saddle, then down to the rear wheel. Following a fixed path means you cannot forget a section.
| Point | What to check | Bad sign |
|---|---|---|
| Front wheel | Spin it; check trueness, spoke tension, hub play | Wobble, loose spokes, rocking at the rim |
| Front tyre | Pressure, tread, sidewall cuts, embedded debris | Cuts through the casing, cracking, bulges |
| Fork and headset | Front brake on, rock the bike back and forth | A knock felt through the head tube |
| Bars and stem | Grip the front wheel between your knees and twist | Bars rotate; stem bolts loose |
| Brake levers | Squeeze both hard | Lever reaching the bar; spongy feel |
| Frame | Sight along the tubes; inspect welds and joints | Cracks, dents, rippled paint, corrosion |
| Cranks and pedals | Grasp each arm; push and pull sideways | Play at the bottom bracket; rough pedal bearings |
| Chain and sprockets | Measure chain wear; look at tooth profile | 0.5%+ wear; hooked, shark-fin teeth |
| Saddle and post | Try to twist and tilt the saddle | Movement; post below minimum insertion |
| Rear wheel and tyre | As the front, plus cassette play | Wobble, hub play, worn sprockets |
Step 3: brakes
Brakes come before gears, always. A bike that shifts badly is annoying; a bike that stops badly is a hazard.
- Check pad thickness against the wear line or the manufacturer's minimum — see replacing brake pads.
- Squeeze each lever hard. It should firm up well before reaching the bar, with no sponginess.
- Spin each wheel and listen for rubbing. Fixes are in fixing bike brakes.
- Inspect cables for fraying at the lever and the anchor bolt. Any broken strand means replace now — replacing a brake cable.
- On rim brakes, check the rim braking surface for wear. Many rims have a wear indicator groove; when it disappears the rim is finished.
- Set pad alignment and clearance per adjusting bike brakes.
- Test at walking pace before riding properly.
Step 4: gears
Run through every gear slowly by hand, listening. Most bikes need nothing more than a quarter turn of the barrel adjuster to take up cable stretch.
- Shift through the whole cassette in both directions. Hesitation going up the cassette means more cable tension is needed.
- Check the derailleur hanger is straight by sighting from behind — a bent hanger makes correct indexing impossible.
- Confirm the derailleur cannot reach the spokes at the largest sprocket. That limit screw protects your wheel.
- Work through adjusting bike gears if anything is off, and the rear derailleur guide for a full setup.
Step 5: drivetrain wear
This is the measurement that saves the most money, and it takes thirty seconds with a chain checker.
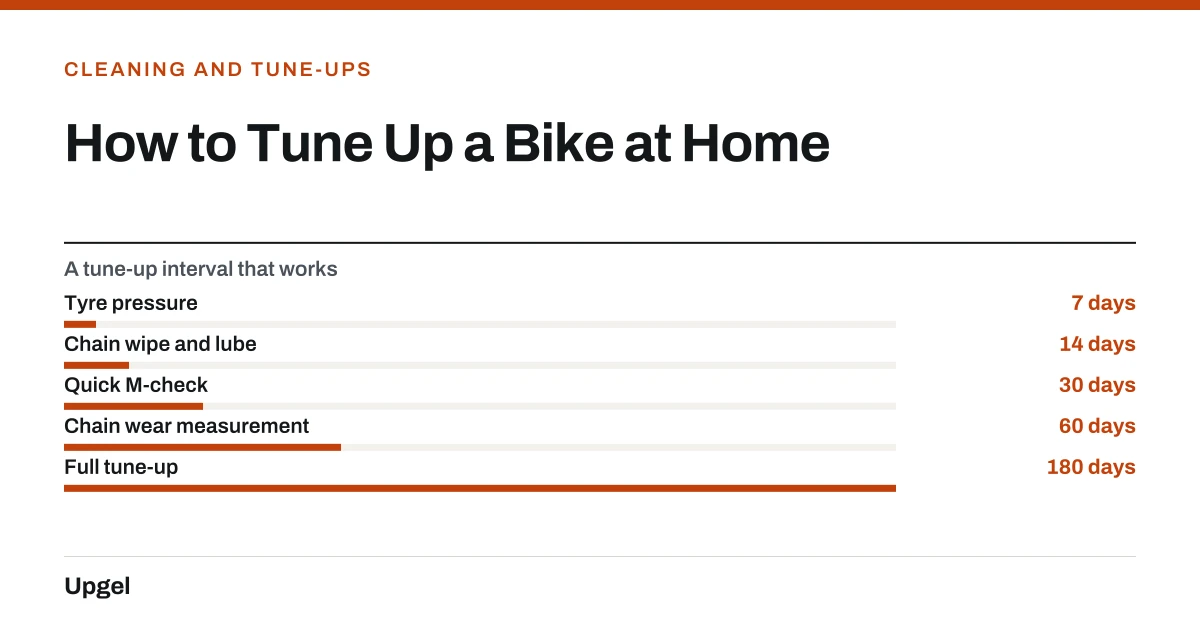
- Tyre pressure7days
Tubes lose pressure steadily; tubeless faster.
- Chain wipe and lube14days
Or same-day after any wet ride.
- Quick M-check30days
Ten minutes. Catches most things.
- Chain wear measurement60days
Replace at 0.5% on 11-speed and above.
- Full tune-up180days
Twice a year for regular riding.
- Measure the chain. Replace at 0.5% wear on 11- and 12-speed, 0.75% on 8- to 10-speed — replacing a bike chain.
- Look at the cassette teeth. Hooked, asymmetric profiles mean it has worn to match an old chain.
- Check the chainrings the same way.
- Spin the derailleur jockey wheels — they should turn freely without grinding.
Step 6: bolts and pressure
| Fastener | Typical torque |
|---|---|
| Stem bolts (bar clamp and steerer) | 5–7 Nm |
| Seatpost clamp | 5–7 Nm (often 4–5 on carbon) |
| Saddle rail clamp | 5–8 Nm |
| Pedal into crank | 35 Nm |
| Brake and gear cable anchor bolts | 6–8 Nm |
| Disc rotor bolts | 4–6 Nm |
| Chainring bolts | 12 Nm |
Finish by setting tyre pressure to the range printed on the sidewall, and check both wheels are properly secured — quick-release levers closed firmly, or thru-axles torqued.
What to leave to a shop
Being honest about this is part of doing the job well.
- Hydraulic brake bleeding — needs the right kit and the right fluid, and getting it wrong means no brakes.
- Wheel building and serious truing — a small buckle is home territory; a badly out-of-true or damaged wheel is not.
- Bearing replacement — headsets, bottom brackets and hubs need presses and specific tools.
- Suspension servicing — sealed, pressurised and unforgiving.
- Any crack, or any doubt about a frame, fork, bar, stem or post.
- Anything you are not confident testing afterwards. That is the real line.
Frequently asked questions
What is included in a bike tune-up?
Cleaning, a systematic inspection of wheels, tyres, frame, bars, cranks and saddle, then brake adjustment, gear indexing, chain wear measurement, and a check of bolt torques and tyre pressure.
How often should I tune up my bike?
A full tune-up twice a year for regular riding, a ten-minute M-check monthly, chain wear measured every couple of months, and tyre pressure weekly.
What is an M-check on a bike?
An inspection route shaped like the letter M — front wheel up to the bars, down to the bottom bracket, up to the saddle, down to the rear wheel — so that no part of the bike gets skipped.
Can I tune up my own bike?
Most of it, yes, with basic tools. Leave hydraulic brake bleeding, wheel building, bearing replacement and suspension servicing to a shop, along with anything you cannot confidently test afterwards.
Sources
- Bicycle Tools — Sheldon Brown / Harris Cyclery
Supports: The tool set required for home maintenance and which jobs need shop-only equipment.
- 16 CFR Part 1512 — Requirements for Bicycles — eCFR, US Government
Supports: Federal requirements for bicycle braking performance and assembly integrity that a tune-up should verify.
- Chains — Sheldon Brown
Supports: Chain wear measurement thresholds and how worn chains damage cassettes and chainrings.