How to Adjust a Rear Derailleur
By Cal WhitmoreUpdated 9 min read
The short answer
Work in a fixed order: check the hanger is straight, set B-tension to about a 6 mm gap at the largest sprocket, set the L and H limit screws, then index with the barrel adjuster a quarter turn at a time.
Key takeaways
- Order matters more than technique. Limit screws before cable tension, and hanger alignment before either.
- Limit screws do not set the gears — they only stop the derailleur travelling too far at each end.
- Indexing is done with the barrel adjuster. A quarter turn is a big change.
- If shifting is bad in every gear, suspect a bent hanger, a worn chain, or dirty cables before touching a screw.
Rear derailleur adjustment has a reputation for being fiddly, and it earns that reputation almost entirely when people do it in the wrong order. There are four adjustments, they interact, and three of them only need setting once. Do them in sequence and the whole thing takes ten minutes.
The order, and why
| # | Adjustment | What it controls | How often |
|---|---|---|---|
| 1 | Hanger alignment | Whether the derailleur hangs parallel to the sprockets | Only after a knock |
| 2 | B-tension | Gap between upper jockey wheel and largest sprocket | Once per setup |
| 3 | L and H limit screws | How far the derailleur can travel at each extreme | Once per setup |
| 4 | Cable tension (indexing) | Which sprocket the chain sits on per click | Whenever shifting drifts |
Step 1: check the hanger
The derailleur hangs from a small replaceable aluminium tab called the hanger, deliberately made soft so it bends before your frame does. It bends easily — laying the bike on its drive side is enough. A bent hanger makes perfect indexing impossible, because the derailleur is no longer parallel to the cassette.
- Look from directly behind the bike, at eye level with the cassette.
- The derailleur cage and the two jockey wheels should sit in the same plane as the sprockets.
- If the cage leans inwards towards the spokes, the hanger is bent.
- A proper alignment gauge is the right tool. Bending it back by hand works but is imprecise and hangers can snap.
- If it is bent badly, replace it. They are cheap, model-specific, and worth having a spare of.
Step 2: set B-tension
The B-tension screw pushes against the hanger and rotates the whole derailleur body backwards, changing how close the upper jockey wheel sits to the sprockets. Too close and the chain grinds in the largest sprocket; too far and shifting becomes vague and slow.
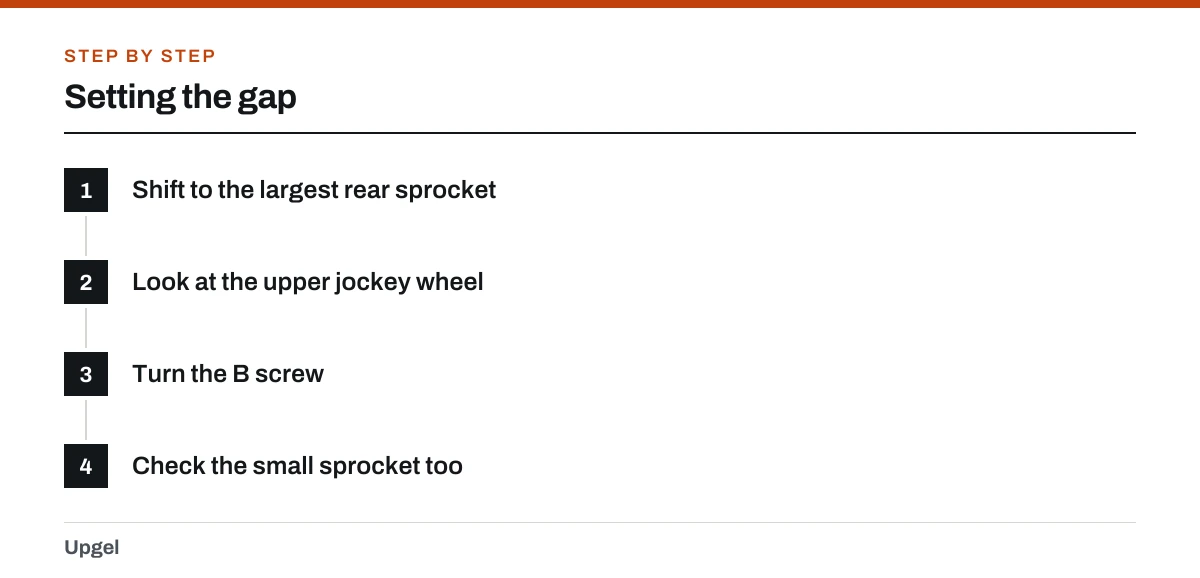
Setting the gap
Shift to the largest rear sprocket
And the smallest chainring at the front, which puts the system at its most compressed.
Look at the upper jockey wheel
You want a gap of roughly 6 mm between its teeth and the teeth of the largest sprocket — around the thickness of two stacked coins.
Turn the B screw
Clockwise increases the gap, counter-clockwise reduces it. It is on the back of the derailleur where it meets the hanger.
Check the small sprocket too
Shift to the smallest sprocket and confirm the gap has not become excessive there.
Step 3: the limit screws
Two screws, usually marked H and L, are simple mechanical stops. They do not participate in shifting at all — they only prevent the derailleur from travelling past the smallest sprocket into the frame, or past the largest sprocket into the spokes. That second one is the important one.
Setting L and H
Disconnect the cable, or at least slacken it
Limits must be set with no cable tension influencing where the derailleur sits.
Set H first
With no cable tension, the derailleur springs to the smallest sprocket. Turn the H screw so the upper jockey wheel lines up directly under the smallest sprocket — not further out.
Set L
Push the derailleur by hand towards the largest sprocket. Turn the L screw so it stops with the jockey wheel directly under the largest sprocket and cannot go past it.
Verify L carefully
Push firmly. The derailleur must not be able to reach the spokes. This is the one adjustment that can destroy a wheel, a derailleur and a hanger in one shift.
Reconnect the cable
Pull it snug by hand with the shifter in its highest position and tighten the anchor bolt.
Step 4: indexing with the barrel adjuster
This is the adjustment you will actually use. The barrel adjuster sits where the cable enters the derailleur, and sometimes at the shifter too. Screwing it out lengthens the housing path, which effectively increases cable tension and moves the derailleur towards the larger sprockets.
Indexing the gears
Shift to the smallest sprocket
The highest gear, with the least cable tension.
Pedal and shift up one click
Turn the cranks and click once towards the larger sprockets.
Watch what happens
If the chain does not move up, there is not enough tension — turn the barrel adjuster counter-clockwise a quarter turn. If it overshoots or is noisy, there is too much — turn it clockwise a quarter turn.
Work up the cassette
Repeat through every sprocket. Then work back down, because shifting down can need slightly different tension.
Fine-tune by ear
In each gear, the drivetrain should be quiet. A persistent rattle in one gear means the tension is fractionally out.
Check both chainrings
Front position changes chain angle, so verify indexing in the big ring as well as the small.
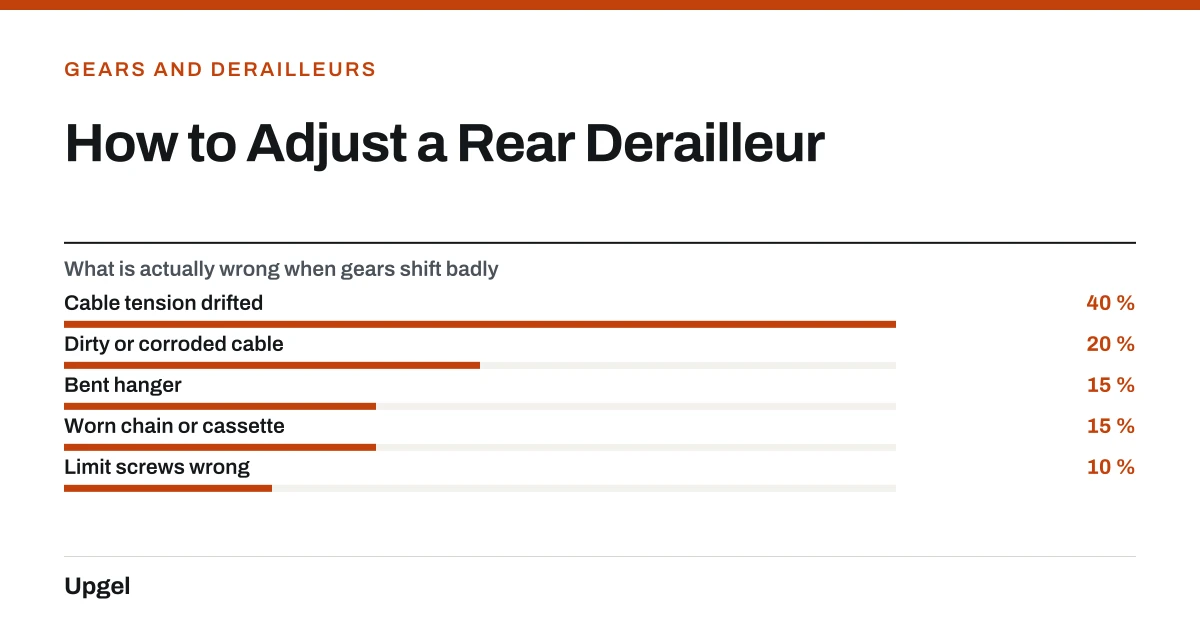
- Cable tension drifted40%
The barrel adjuster job. Quick.
- Dirty or corroded cable20%
New inner and housing fixes it.
- Bent hanger15%
Nothing else will work until this is straight.
- Worn chain or cassette15%
Adjustment cannot fix worn parts.
- Limit screws wrong10%
Usually after someone else 'fixed' it.
Front derailleur adjustment follows its own sequence and is covered in adjusting a front derailleur. For a symptom-led approach across the whole drivetrain, start at adjusting bike gears.
The limit screws do not control shifting; they only limit the travel of the derailer.
Sheldon Brown, Derailer Adjustment
Frequently asked questions
Which way do I turn the barrel adjuster on a rear derailleur?
Counter-clockwise increases cable tension and moves the chain towards the larger sprockets. Clockwise reduces tension and moves it towards the smaller ones. Work in quarter turns.
What do the H and L screws do on a rear derailleur?
They are mechanical stops only. H limits travel at the smallest sprocket, L limits travel at the largest. Neither affects shifting between gears — that is cable tension.
Why do my gears skip after adjusting the derailleur?
Most often the chain or cassette is worn, which adjustment cannot fix. If the parts are good, check the hanger is straight before touching the barrel adjuster again.
How much gap should there be between the jockey wheel and the cassette?
About 6 mm at the largest sprocket, set with the B-tension screw. Too small causes grinding in the low gears; too large makes shifting vague.
Sources
- Derailer Adjustment — Sheldon Brown
Supports: That limit screws only bound travel rather than control shifting, and the sequence of limit setting before indexing.
- Rear Derailleur Adjustment — Park Tool
Supports: B-tension gap setting at the upper jockey wheel and barrel adjuster indexing procedure.
- Chains — Sheldon Brown
Supports: That a worn chain produces skipping that derailleur adjustment cannot correct.