How to Adjust a Front Derailleur
By Cal WhitmoreUpdated 8 min read
The short answer
Work in order. Set the cage height so the outer plate clears the big chainring teeth by 1 to 2 mm, rotate it parallel to the rings, then set the L and H limit screws and finish with cable tension.
Key takeaways
- Height and rotation come first. Adjusting limit screws on a badly positioned cage never gives a good result.
- 1 to 2 mm clearance over the big ring teeth, and the cage exactly parallel to the rings.
- L stops the chain dropping inside towards the frame; H stops it dropping outside past the big ring.
- Front shifting needs you to ease off the pedals. No adjustment makes shifting under full load reliable.
The front derailleur is a crude device compared with the rear one: it is a cage that shoves the chain sideways until it climbs onto a different ring. Because it is crude, positioning matters enormously. Most front shifting complaints come down to a cage that is too high, too low, or not parallel to the rings.
The order
- Height — how far above the big chainring the cage sits.
- Rotation — whether the cage is parallel to the chainrings.
- Low limit (L) — how far inboard the cage can travel.
- High limit (H) — how far outboard the cage can travel.
- Cable tension — fine-tuning, and trim on systems that have it.
Step 1: cage height
Setting the height
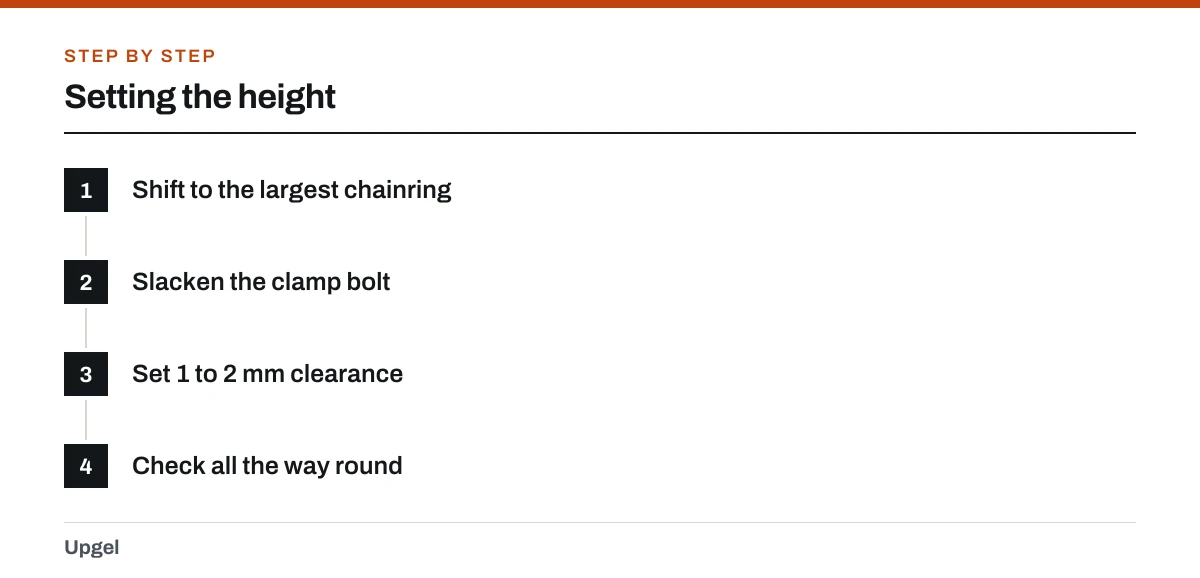
Shift to the largest chainring
So the cage sits at its outermost position, directly over the big ring.
Slacken the clamp bolt
Just enough that the derailleur can slide on the seat tube but still holds position.
Set 1 to 2 mm clearance
The bottom edge of the outer cage plate should clear the tips of the big ring teeth by about the thickness of a coin.
Check all the way round
Rotate the cranks slowly. Chainrings are rarely perfectly true, so check the clearance at several points and set it at the tightest.
Step 2: rotation
With the clamp still slightly loose, sight down from directly above. The cage plates should be exactly parallel to the chainrings. Any twist means one end of the cage contacts the chain before the other, which produces slow, noisy shifts and chain rub that no amount of tension adjustment removes.
- Look straight down the seat tube from above the saddle.
- The outer cage plate should line up with the plane of the big chainring.
- Rotate the derailleur body until it does, then tighten the clamp bolt properly — usually 5 to 7 Nm.
- Re-check height afterwards. Tightening the clamp often shifts the position slightly.
Steps 3 and 4: the limit screws
Two screws sit on top of the derailleur, usually marked L and H. They are stops, nothing more. L controls how far inboard the cage swings; H controls how far outboard.
| Screw | Shift to | Target gap | If wrong |
|---|---|---|---|
| L (low) | Smallest chainring, largest rear sprocket | 0.5 mm between inner cage plate and chain | Too loose: chain drops inside. Too tight: chain rubs in low gears |
| H (high) | Largest chainring, smallest rear sprocket | 0.5 mm between outer cage plate and chain | Too loose: chain drops outside. Too tight: will not reach big ring |
Working through the limits
Set L with the cable slack
Shift to the smallest ring. Slacken the cable anchor bolt so cable tension is not influencing the position.
Adjust L to a 0.5 mm gap
Clockwise moves the cage outboard, away from the frame. You want the inner plate just clear of the chain, not touching.
Reconnect and tension the cable
Pull it snug by hand and tighten the anchor bolt.
Shift to the big ring and set H
In the big ring with the smallest rear sprocket, adjust H so the outer plate sits about 0.5 mm from the chain.
Test both extremes under load
Turn the cranks and shift up and down several times. The chain should move promptly and never go past either ring.
If the chain is still dropping after this, the cause is usually height or rotation rather than the limit screws — and putting a bike chain back on covers reading which side it drops to and what that indicates.
Step 5: cable tension and trim
Front cable tension is less critical than rear, because there are only two or three positions rather than eleven. Use the barrel adjuster at the shifter, if there is one, to remove any hesitation shifting up to the big ring.
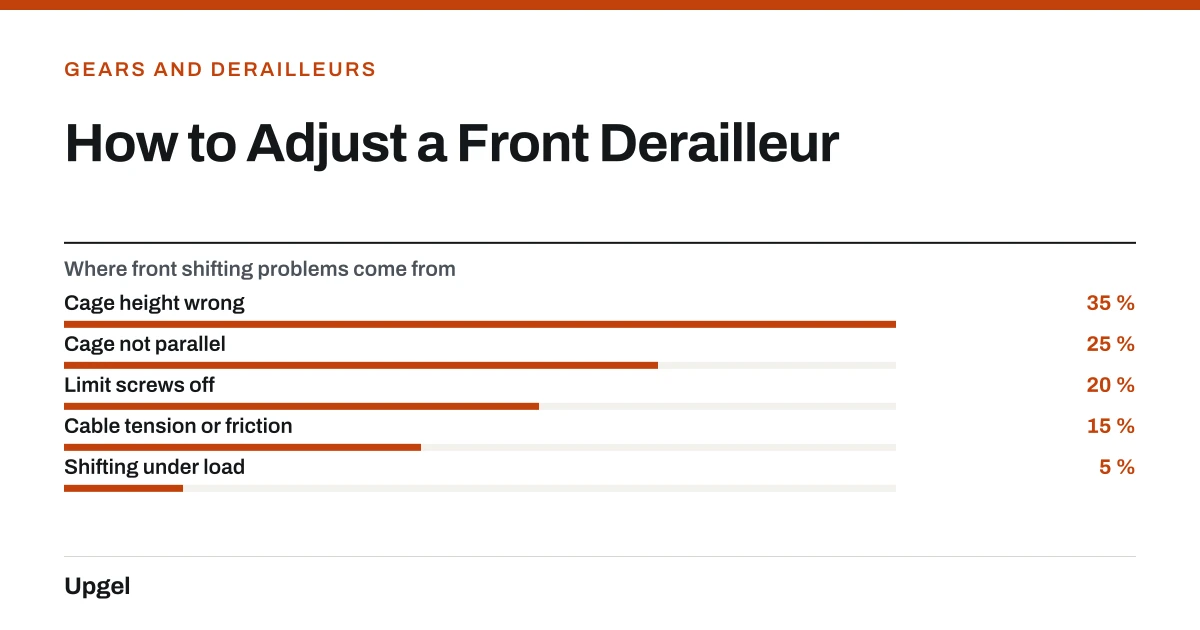
- Cage height wrong35%
Usually set too high. Check with a coin.
- Cage not parallel25%
Sight down from directly above.
- Limit screws off20%
The screws people reach for first.
- Cable tension or friction15%
Check the cable runs freely first.
- Shifting under load5%
Technique, not adjustment.
Rear derailleur setup is a separate and longer sequence, covered in adjusting a rear derailleur.
Frequently asked questions
How high should a front derailleur be?
The bottom of the outer cage plate should clear the tips of the largest chainring teeth by 1 to 2 mm. Check at several points as you rotate the cranks, since chainrings are rarely perfectly true.
Why does my chain drop off the front chainring?
If it drops inside towards the frame, the L limit screw is too loose. If it drops outside, check the cage height first — too high is a more common cause than the H screw.
What do the L and H screws do on a front derailleur?
They are travel stops. L sets how far inboard the cage can swing towards the small ring, H sets how far outboard towards the big ring. Neither affects shifting speed.
Why does my chain rub the front derailleur in some gears?
In extreme combinations — big ring with the largest sprocket, or small ring with the smallest — the chain runs at a severe angle and light rub is normal. Use the trim position if your shifter has one.
Sources
- Derailer Adjustment — Sheldon Brown
Supports: Front derailleur cage height and rotation setup, and limit screws as travel stops rather than shift controls.
- Front Derailleur Adjustment — Park Tool
Supports: The 1–2 mm cage clearance figure and the 0.5 mm chain-to-plate gaps for setting L and H.
- Chains — Sheldon Brown
Supports: Why extreme cross-chained combinations produce chain rub and increased wear.