How to Replace a Bike Brake Cable
By Cal WhitmoreUpdated 8 min read
The short answer
Undo the anchor bolt, pull the old inner wire out through the lever, and cut new housing to the same lengths with proper cable cutters. Fit ferrules to every housing end, then tension at the anchor bolt.
Key takeaways
- Replace the housing at the same time as the inner wire. A new wire inside old, compressed housing fixes very little.
- Use proper cable cutters. Side cutters crush the housing spiral and the cable will never run smoothly again.
- Ferrules on every housing end. Without them the housing digs into the stop and your tension disappears over the first week.
- Brake and gear housing are not the same. Brake housing is spiral-wound for strength; gear housing is longitudinal for precision.
A brake cable is two parts doing two jobs: an inner wire that pulls, and an outer housing that pushes back. People replace the wire and leave the housing, then wonder why the lever still feels vague. If the cable is old enough to need replacing, the housing has almost certainly compressed, cracked at the bends, or filled with grit and water.
When it needs doing
- Rust-coloured dust at the ends of the housing — the inner wire is corroding inside.
- Fraying at the anchor bolt or where the wire enters the lever. Any broken strand means replace now.
- The lever does not spring back cleanly, or the brake stays partly on after you release it.
- A vague, spongy feel that persists no matter how you set tension.
- Visible kinks, splits or crushed sections in the outer housing.
- As routine maintenance, roughly every two years for a bike ridden year-round.
Getting the right parts
| Part | What to look for | Note |
|---|---|---|
| Inner wire | Brake cable, correct nipple shape | Road levers take a barrel nipple; flat-bar levers take a pear nipple. Many come double-ended — cut off the one you do not need. |
| Outer housing | Spiral-wound brake housing | Never use gear housing for brakes. It is not built to take the compressive load. |
| Ferrules | End caps matching housing diameter | Usually 5 mm for brake housing. Buy a few spares. |
| End caps | Crimp-on tips | Stops the cut end fraying into a hand-shredding brush. |
| Cable cutters | Purpose-made bicycle cutters | The one tool you should not substitute. |
Removing the old cable
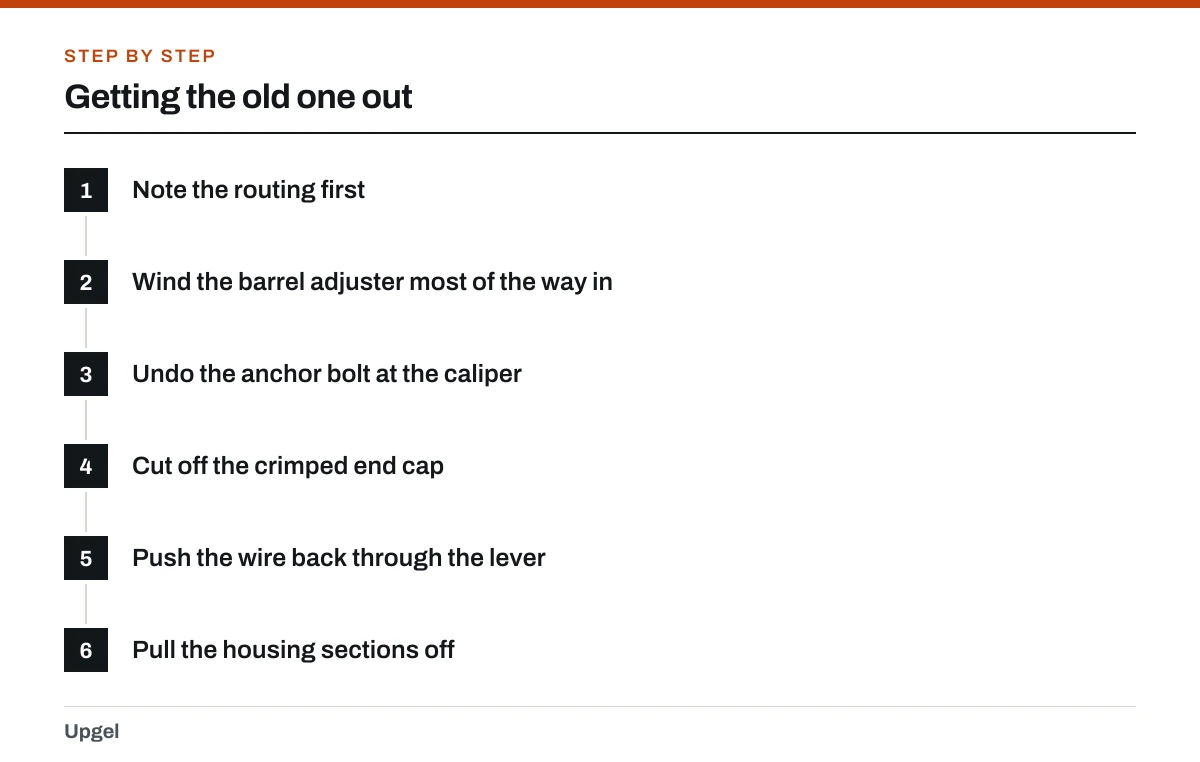
Getting the old one out
Note the routing first
Take a photo. Cable routing looks obvious until the old one is off the bike and you are guessing which side of the head tube it ran.
Wind the barrel adjuster most of the way in
This gives you adjustment range later. Details in tightening bike brakes.
Undo the anchor bolt at the caliper
Usually 5 mm Allen or 9 mm nut. Free the wire completely.
Cut off the crimped end cap
So the wire can pull back through the housing without snagging.
Push the wire back through the lever
Squeeze the lever to expose the nipple seat, then push the wire towards the lever and lift the nipple out of its recess.
Pull the housing sections off
Keep them. You will cut the new housing to match these lengths exactly.
Cutting the housing
This is the step that determines whether the finished job feels sharp or mushy, and it is where most home jobs go wrong. Brake housing is a tight steel spiral. A side cutter squashes that spiral flat, so the housing loses length under load and the lever feel goes soft.
A clean cut
Lay the old housing alongside the new
Match the length exactly, unless the old length was wrong — housing should curve smoothly with no tight bends and no slack loops.
Cut with proper cable cutters
One firm squeeze. Do not saw at it.
Check the cut end
It should be square and open. If the spiral is pinched shut, cut again a few millimetres along.
Open the liner
If the housing is lined, the plastic liner often closes over. Open it with a sharp point or a spare spoke so the wire runs free.
Fit a ferrule to each end
Push it fully home. This is what spreads the load into the frame stop instead of letting the housing bore into it.
Fitting the new cable
Installation
Seat the nipple in the lever
Squeeze the lever to expose the recess, drop the nipple in, and check it is properly seated before letting go.
Thread the wire through each housing section
Follow the route from your photo. Keep the wire clean — do not drag it on the floor.
Add a little grease at the ends, if unlined
A smear where the wire enters each housing section. Skip this entirely on lined housing; it attracts grit.
Pull the slack through at the caliper
Hold the pads at the clearance you want — 1 to 2 mm per side on rim brakes — and pull the wire snug with pliers.
Tighten the anchor bolt firmly
It must not slip. Around 6–8 Nm on most calipers.
Pre-stretch the cable
Squeeze the lever hard, ten times. New cables settle, and doing it now means you retension once here instead of on the road.
Retension, then cut and cap
Take up the slack that pre-stretching revealed, then cut the excess to about 40 mm and crimp on an end cap.
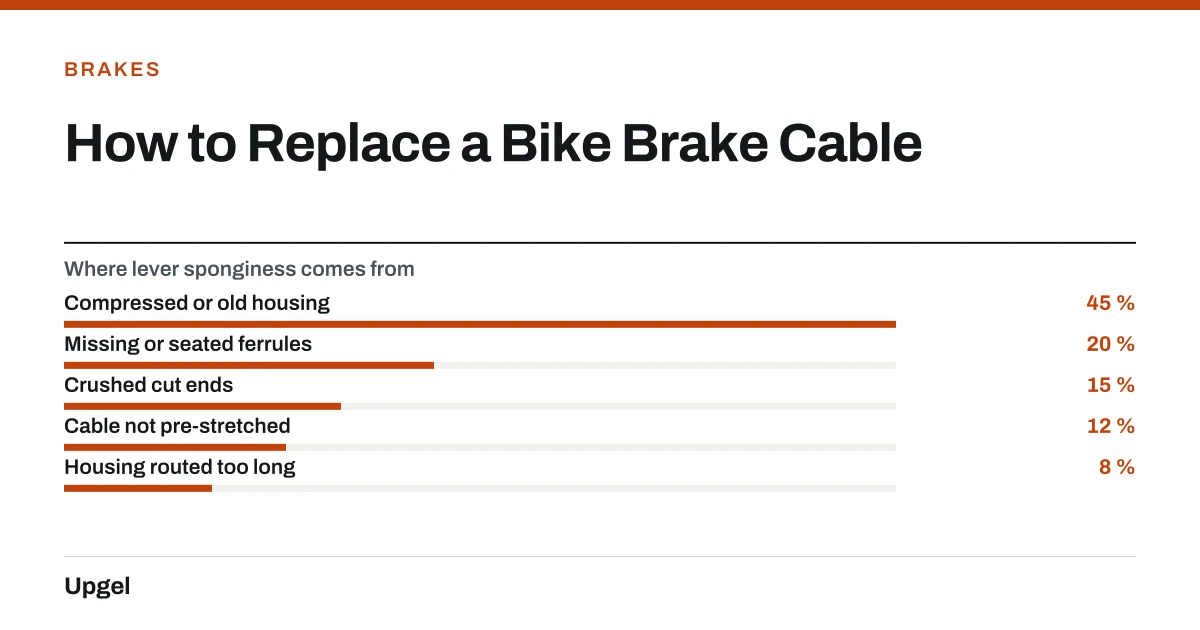
- Compressed or old housing45%
Shortens under load. New wire alone will not fix it.
- Missing or seated ferrules20%
Housing bores into the frame stop.
- Crushed cut ends15%
From using side cutters instead of cable cutters.
- Cable not pre-stretched12%
Feels fine, then goes slack after one ride.
- Housing routed too long8%
Extra bends add friction and travel.
Finishing up
With the new cable in, set the pads properly using adjusting bike brakes — a new cable is the right moment to check pad height and toe-in rather than assuming the old settings still apply. Then test the brake hard while stationary, and again at walking pace before your first real ride.
If the lever still does not feel right after all this, the problem is elsewhere. Work through the symptom table in fixing bike brakes, and check pad thickness against the limits in replacing bike brake pads.
Frequently asked questions
Should I replace brake housing as well as the cable?
Yes, in almost every case. Old housing compresses under load and holds grit and water, so a new inner wire inside old housing usually still feels spongy.
Can I use gear cable housing for brakes?
No. Gear housing uses longitudinal strands for precision and is not built for the compressive load of braking. Brake housing is spiral-wound. Using the wrong one is a genuine safety issue.
How long should bike brake cables last?
Roughly two years of year-round riding, though a bike kept indoors and ridden in dry weather can go much longer. Replace immediately at the first sign of fraying.
Why does my new brake cable go slack after a ride?
New inner wire settles and the housing beds into its ferrules. Pre-stretch by squeezing the lever hard ten times during fitting, then retension before you cut the excess.
Sources
- Bicycle Brakes — Sheldon Brown
Supports: Cable and housing construction, the difference between brake and gear housing, and anchor-bolt tensioning.
- Bicycle Tools — Sheldon Brown / Harris Cyclery
Supports: Why purpose-made cable cutters are required and what side cutters do to spiral-wound housing.
- 16 CFR Part 1512 — Requirements for Bicycles — eCFR, US Government
Supports: Federal handbrake loading and performance requirements under 1512.18 that a frayed or slipping cable would fail.