How to Tighten Bike Brakes
By Cal WhitmoreUpdated 7 min read
The short answer
Turn the barrel adjuster counter-clockwise a few turns to take up cable slack and bring the pads closer. If it runs out of thread, wind it back in, loosen the anchor bolt, pull a few millimetres through and retighten.
Key takeaways
- Barrel adjuster first, always. It is designed for exactly this and needs no tools.
- Counter-clockwise, viewed from the adjuster end, lengthens the housing and tightens the brake.
- If you have wound the adjuster right out, wind it back in before using the anchor bolt, so you keep adjustment range for later.
- A lever that still reaches the bar after tightening usually means worn pads or a cable problem, not insufficient tension.
Brakes loosen gradually and quietly. Cables stretch a little in their first weeks, housing compresses, and pads wear thinner — each one adds a fraction of a millimetre of lever travel until one day you notice the lever is coming most of the way back to the bar. Tightening them takes about a minute if you use the right adjuster.
Start with the barrel adjuster
The barrel adjuster is a small knurled cylinder where the cable housing enters the brake lever, or on the caliper itself. It works by changing the effective length of the outer housing. Screw it out and the housing gets longer, which pulls more cable through and closes the pads.
Using the barrel adjuster
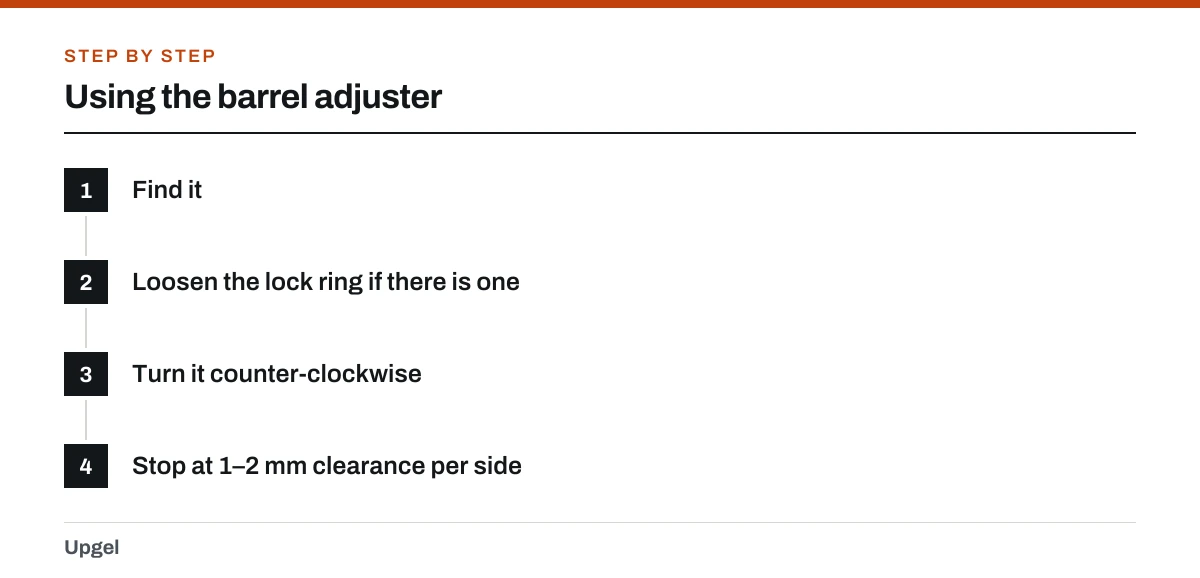
Find it
On road bikes it is usually on the caliper. On flat-bar bikes it is where the cable enters the lever. Some bikes have both.
Loosen the lock ring if there is one
Many adjusters have a thin lock nut that must be backed off before the adjuster will turn.
Turn it counter-clockwise
Half a turn at a time. Squeeze the lever between turns and watch the pad gap close.
Stop at 1–2 mm clearance per side
Spin the wheel to confirm nothing rubs, then tighten the lock ring back against the adjuster.
When the adjuster runs out
If you have wound the adjuster nearly all the way out and the brake is still loose, you need to take up slack at the cable anchor bolt on the caliper. Crucially, wind the barrel adjuster most of the way back in first — otherwise you finish the job with no adjustment range left for the next time the pads wear.
Resetting cable tension at the anchor
Wind the barrel adjuster back in
Leave two or three turns of thread showing so you can still fine-tune afterwards.
Loosen the anchor bolt
Usually a 5 mm Allen key or 9 mm nut on the caliper. Loosen it just enough that the cable can slide.
Hold the pads closed
Squeeze the caliper arms together by hand to the clearance you want, or use a third-hand tool.
Pull the cable snug and tighten
Draw the slack through with pliers, hold it, and tighten the anchor bolt firmly. It must not slip.
Fine-tune with the barrel adjuster
Now use the adjuster to get the last millimetre exactly right.
Test hard before riding
Squeeze the lever as hard as you can several times. This seats the cable and reveals a slipping anchor bolt while you are stationary.
When tightening is the wrong fix
| Symptom | Likely cause | What to do |
|---|---|---|
| Lever still reaches the bar after tightening | Pads worn to the backing | Replace pads |
| Brake feels spongy and vague | Compressed or split housing, or air in hydraulics | Replace cable and housing, or bleed |
| Tension keeps disappearing | Anchor bolt slipping, or cable stretching at a frayed strand | Retighten properly, or fit a new cable |
| Brake grabs then fades | Glazed or contaminated pads | Deglaze or replace; clean the rim or rotor |
| Only one pad moves | Caliper not centred or a seized pivot | Centre it; free and grease the pivot |
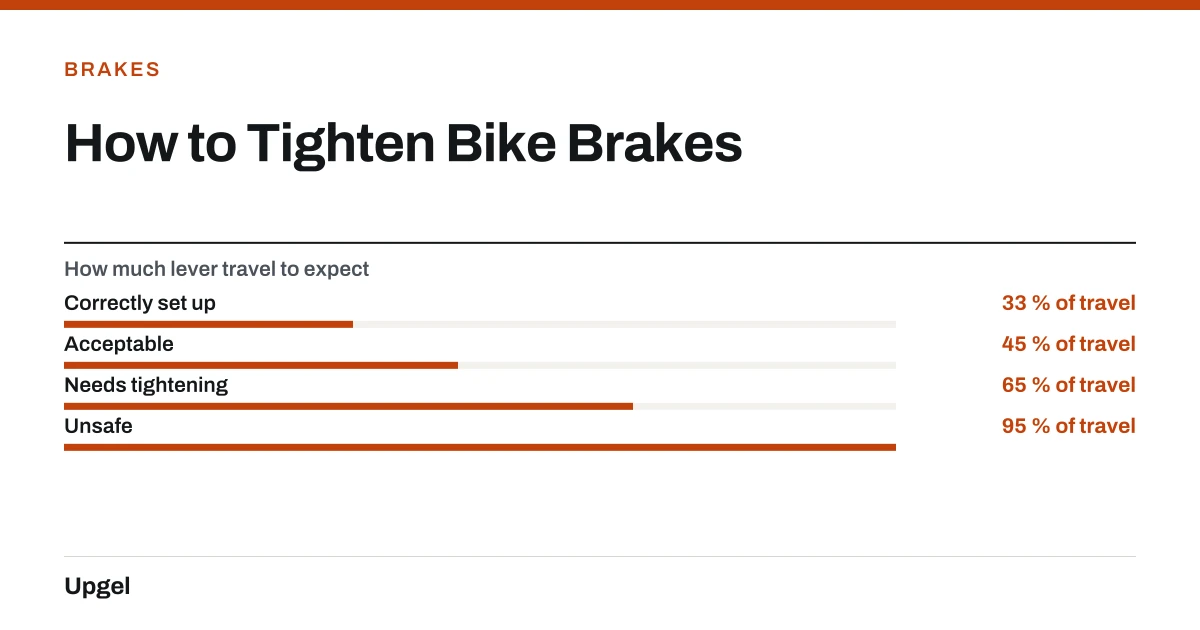
- Correctly set up33% of travel
Bites about a third of the way in.
- Acceptable45% of travel
Still safe, worth taking up soon.
- Needs tightening65% of travel
Barrel adjuster time.
- Unsafe95% of travel
Lever reaching the bar. Do not ride.
After tightening
- Spin both wheels and listen for rub. A brake that just touches will overheat the rim and wear the pad fast.
- Check the pads still sit squarely on the braking surface — tightening can shift them slightly. See adjusting bike brakes.
- Check both pads move together. If not, centre the caliper.
- Test at walking pace before your first real ride, front and rear separately.
- If it is now too tight and drags, loosening bike brakes covers backing it off.
If tightening has not solved whatever brought you here, work through the symptom table in fixing bike brakes, which covers squealing, rubbing, sticking and uneven braking in turn.
Frequently asked questions
Which way do I turn the barrel adjuster to tighten a brake?
Counter-clockwise, which unscrews it outwards and lengthens the cable housing. That pulls the pads closer to the rim or rotor.
Why do my brakes keep getting loose?
New cables stretch for the first few weeks, and pads wear continuously. If it happens repeatedly in a short period, suspect a slipping anchor bolt or a fraying cable.
How do I tighten brakes with no barrel adjuster left?
Wind the adjuster most of the way back in, loosen the cable anchor bolt on the caliper, pull a few millimetres of cable through with pliers, retighten firmly and fine-tune with the adjuster.
My brake lever still touches the handlebar. What now?
That is almost never a tension problem. Check pad thickness first, then the cable and housing for damage, and on hydraulic brakes suspect air in the system.
Sources
- Bicycle Brakes — Sheldon Brown
Supports: Barrel adjuster function, cable anchor tensioning, and the relationship between pad wear and lever travel.
- Tandem Brakes — Sheldon Brown
Supports: How mechanical advantage and cable travel determine lever feel and bite point.
- 16 CFR Part 1512 — Requirements for Bicycles — eCFR, US Government
Supports: Federal handbrake performance testing requirements referenced in 1512.18, which assume the lever does not bottom on the grip.