How to Replace Bike Brake Pads
By Cal WhitmoreUpdated 7 min read
The short answer
Replace rim pads when the moulded grooves have worn away, and disc pads below about 1 mm of friction material. Fit the new pads square to the braking surface, then bed them in with twenty firm stops.
Key takeaways
- Rim pads are done when the grooves disappear. Disc pads are done at roughly 1 mm of material including the backing.
- Pads are directional and side-specific on many rim brakes. Look for FORWARD, L and R markings before fitting.
- New pads need bedding in. Straight out of the box they stop poorly, which people mistake for a bad product.
- Never let oil, degreaser or chain lube near pads or the braking surface — contaminated pads have to be thrown away.
Brake pads are the cheapest part on a bike that materially affects whether you stop. They are also the part most often left far too long, usually because the wear happens slowly enough that you adapt to it without noticing. A five-minute check every couple of months prevents both a bad surprise and an expensive scored rim.
When to replace them
| Pad type | Replace when | Typical life |
|---|---|---|
| Rim brake (cartridge or block) | Moulded grooves worn flush | 1,000–3,000 miles |
| Disc, resin/organic | Under ~1 mm total including backing | 500–1,500 miles |
| Disc, sintered/metallic | Under ~1 mm total including backing | 1,000–2,500 miles |
| Any pad, contaminated | Immediately, regardless of thickness | — |
| Any pad, glazed hard | If sanding does not restore a matt surface | — |
Choosing the right pads
- Rim brakes: match the pad material to your rim. Alloy rims take standard pads; carbon rims need carbon-specific pads and will be damaged by the wrong ones.
- Disc brakes: pads are shaped for specific caliper families. Take the old pad to the shop or note the caliper model.
- Resin/organic disc pads are quieter and bite well when cold. Sintered/metallic pads last longer and cope better with heat and wet, but are noisier.
- Cartridge rim pads let you replace just the rubber insert, which is cheaper and keeps your alignment.
- Cheap unbranded pads are a false economy on brakes specifically. This is not the place to save five dollars.
Replacing rim brake pads
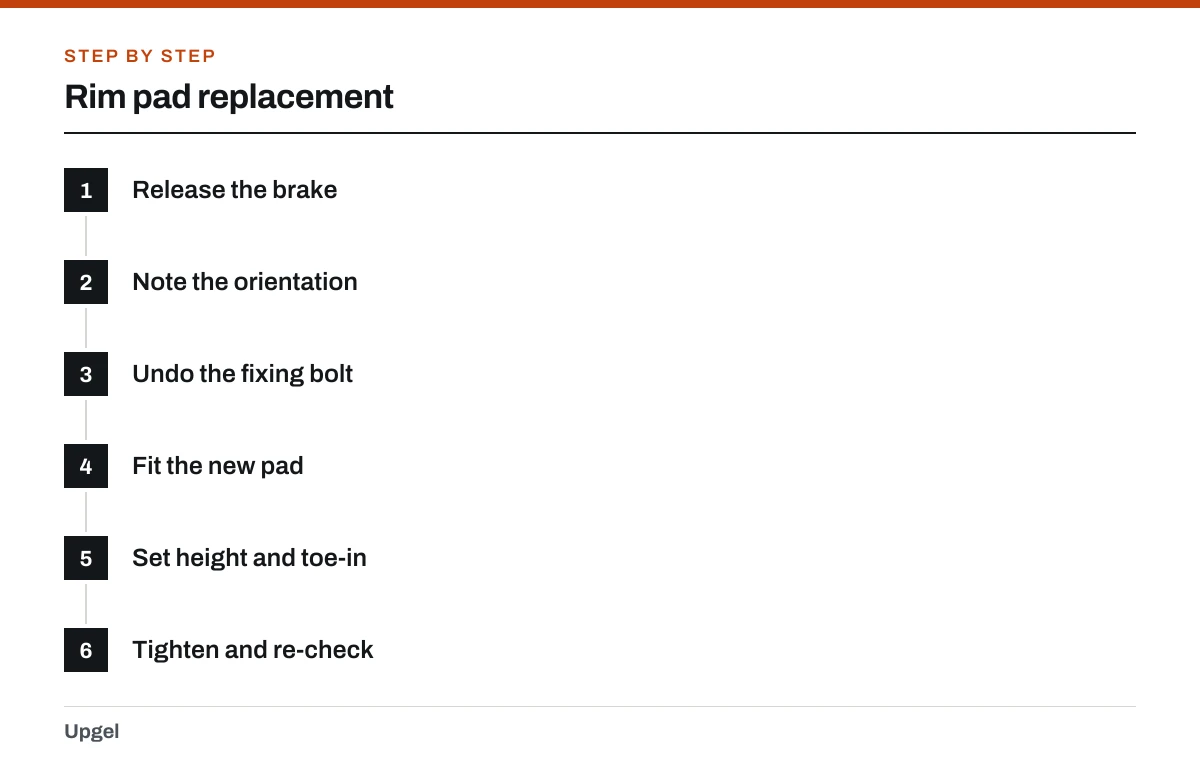
Rim pad replacement
Release the brake
Open the quick-release on a caliper, or unhook the noodle on a V-brake, so the arms swing clear.
Note the orientation
Many pads are marked FORWARD or have L and R. Cartridge holders are open at one end only, and that end must face rearwards or the insert slides out under braking.
Undo the fixing bolt
Usually a 5 mm Allen key. For cartridge pads, remove the small retaining pin or grub screw and slide the old insert out backwards.
Fit the new pad
Slide it in from the rear for cartridges, or bolt the complete pad on loosely so it can still be positioned.
Set height and toe-in
Squarely on the braking surface, not touching the tire, not below the rim. Leading edge about 1 mm closer than the trailing edge.
Tighten and re-check
Pads rotate as you tighten. Squeeze the lever, look again, adjust if needed. Then reset cable tension.
Replacing disc brake pads
Disc pad replacement
Remove the wheel
So you can see and reach the caliper. Method in removing a front bike wheel.
Remove the retaining pin
Usually a split pin, circlip or threaded bolt through the caliper body. Note how it goes back.
Pull the old pads out
They usually lift out upwards along with a small spring clip. Note the spring's orientation.
Push the pistons back
Use a plastic tire lever or a proper piston press against the flat of the old pad. Never lever against the piston face directly.
Fit the new pads with the spring
Assemble pads and spring outside the caliper, then slide the assembly in together. Refit the retaining pin.
Refit the wheel and pump the lever
Squeeze the lever repeatedly until it firms up — this advances the pistons back to the rotor. Do this before you ride, not at the first junction.
Bedding new pads in
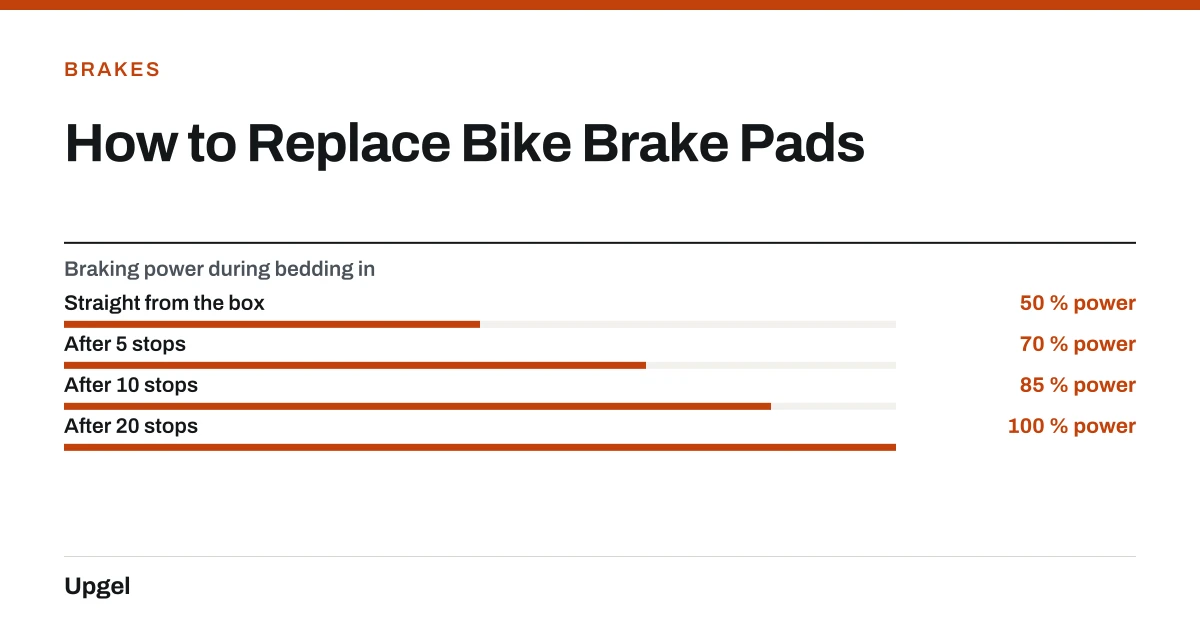
New pads do not work properly until a thin, even layer of pad material has transferred onto the rim or rotor. Straight out of the packet they feel weak and often squeal, and a lot of people conclude the pads are faulty when in fact they simply have not been bedded.
- Straight from the box50% power
Noticeably weak. This is normal.
- After 5 stops70% power
Improving quickly.
- After 10 stops85% power
Most of the way there.
- After 20 stops100% power
Fully bedded. Squeal usually gone too.
How to bed pads in
Find a quiet, flat stretch of road
You need space and no traffic behind you.
Accelerate to about 12 mph
Then brake firmly down to walking pace without locking the wheel.
Repeat about twenty times
Do not come to a complete stop while the brake is hot, as that can leave an uneven deposit.
Let them cool
Ride gently for a few minutes. Braking should now feel noticeably sharper.
If the brake still feels wrong after bedding, work through the symptom list in fixing bike brakes, and re-check pad position and cable tension using adjusting bike brakes.
Frequently asked questions
How do I know when bike brake pads need replacing?
Rim pads are finished when the moulded grooves have worn flush with the surface. Disc pads are finished at roughly 1 mm of total thickness including the metal backing plate.
How long do bike brake pads last?
Rim pads typically last 1,000–3,000 miles and disc pads 500–2,500 miles depending on compound. Wet, gritty riding shortens both dramatically.
Why do my new brake pads not stop well?
They almost certainly need bedding in. About twenty firm stops from moderate speed transfers an even layer of pad material onto the rim or rotor and roughly doubles the initial braking power.
Can I put disc pads in the wrong way round?
On most calipers the pads and spring only assemble one way, but it is possible to fit the spring inverted. Assemble pads and spring outside the caliper first and note the original orientation before removing anything.
Sources
- Bicycle Brakes — Sheldon Brown
Supports: Rim brake pad orientation and toe-in setup, and rim braking-surface wear limits.
- Tandem Brakes — Sheldon Brown
Supports: Differences between pad compounds and their heat handling under sustained braking.
- 16 CFR Part 1512 — Requirements for Bicycles — eCFR, US Government
Supports: Federal handbrake performance requirements that assume functional, correctly fitted friction material.