How to Remove a Front Bike Wheel
By Cal WhitmoreUpdated 6 min read
The short answer
Release the brake if it is a rim brake, then open the quick-release lever and unscrew the adjusting nut a few turns, or undo the thru-axle and slide it out. Never squeeze a disc brake lever with the wheel out.
Key takeaways
- Front wheels have retention tabs on the fork ends by law in the US, so you must unscrew a quick-release several turns, not just flip the lever.
- A quick-release is a cam, not a bolt. It should close with real resistance from halfway, leaving a mark on your palm.
- On disc brakes, a squeezed lever with no rotor closes the pistons and you will have to prise them back apart.
- The lever should end up parallel to the fork or angled back, never pointing forwards where something can catch it.
Getting a front wheel out is the easiest job on a bike and the one most often done slightly wrong. The wheel comes out either way, but the details — how far to unscrew, where the lever ends up, what not to touch while it is out — are what separate a two-minute job from a trip to a shop.
Work out what you have
| Type | How it looks | How it opens |
|---|---|---|
| Quick-release | A lever on one side, a conical nut on the other, thin skewer through the hub | Flip lever open, unscrew the nut 4–6 turns |
| Thru-axle | A thick axle, often 12 or 15 mm, threading into the fork leg | Unscrew fully and slide the axle out |
| Bolt-on | Hex nuts on both ends of a solid axle | 15 mm wrench, loosen both sides |
| Through-bolt | Allen head one side, threaded fork the other | 5 or 6 mm Allen key, unscrew fully |
Release the brake first
An inflated tire is wider than the gap between rim brake pads, so the brake has to open before the wheel will pass.
- Caliper brakes: flip the small lever on the caliper body itself.
- V-brakes: squeeze the arms together and unhook the noodle from its cradle.
- Cantilever brakes: squeeze the arms and unhook the straddle wire.
- Disc brakes: nothing to release — the caliper is at the hub and the rotor slides straight out.
- If you cannot open it far enough, deflate the tire. Details on pad clearance are in adjusting bike brakes.
Removing the wheel
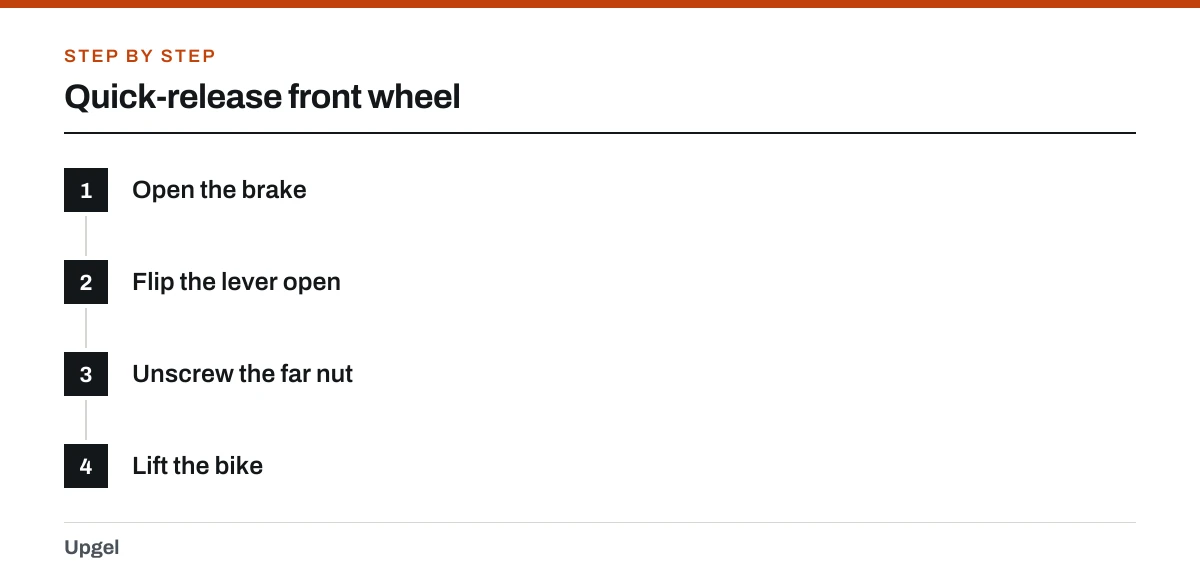
Quick-release front wheel
Open the brake
As above, unless you have disc brakes.
Flip the lever open
It should swing out to sit at 180 degrees from closed. The word OPEN is usually moulded into it.
Unscrew the far nut
Hold the lever still and turn the conical nut counter-clockwise four to six turns. That is enough to clear the retention tabs.
Lift the bike
The wheel drops out under its own weight. On a disc bike, guide the rotor out of the caliper slot without bending it.
Thru-axle front wheel
Open the axle lever or fit an Allen key
Some thru-axles have an integrated lever; others need a 6 mm Allen key.
Unscrew completely
It threads into the far fork leg. Keep turning until it is free.
Slide the axle out
Pull it straight out and put it somewhere safe. It is easy to lose and expensive to replace.
Drop the wheel
There are no retention tabs on a thru-axle fork — the axle itself is the retention.
Putting it back
Refitting safely
Guide the rotor into the caliper
On disc brakes, line up the rotor with the pad slot before the axle goes near the dropouts.
Seat the axle fully
Push the wheel up until the axle is hard against the top of both dropouts. An unseated axle is the most common cause of a wheel sitting crooked.
Close a quick-release properly
Set the nut so the lever meets resistance at the halfway point of its swing, then close it with your palm. It should leave a temporary impression on your hand.
Point the lever safely
It should end up alongside the fork leg or angled back, never forwards where a branch could flip it open.
Torque a thru-axle
Snug, not brutal — usually around 10–15 Nm. Check the figure printed on the axle or fork.
Re-connect the brake and test
Reattach the noodle or straddle wire, spin the wheel to check for rub, and squeeze the lever hard before riding.
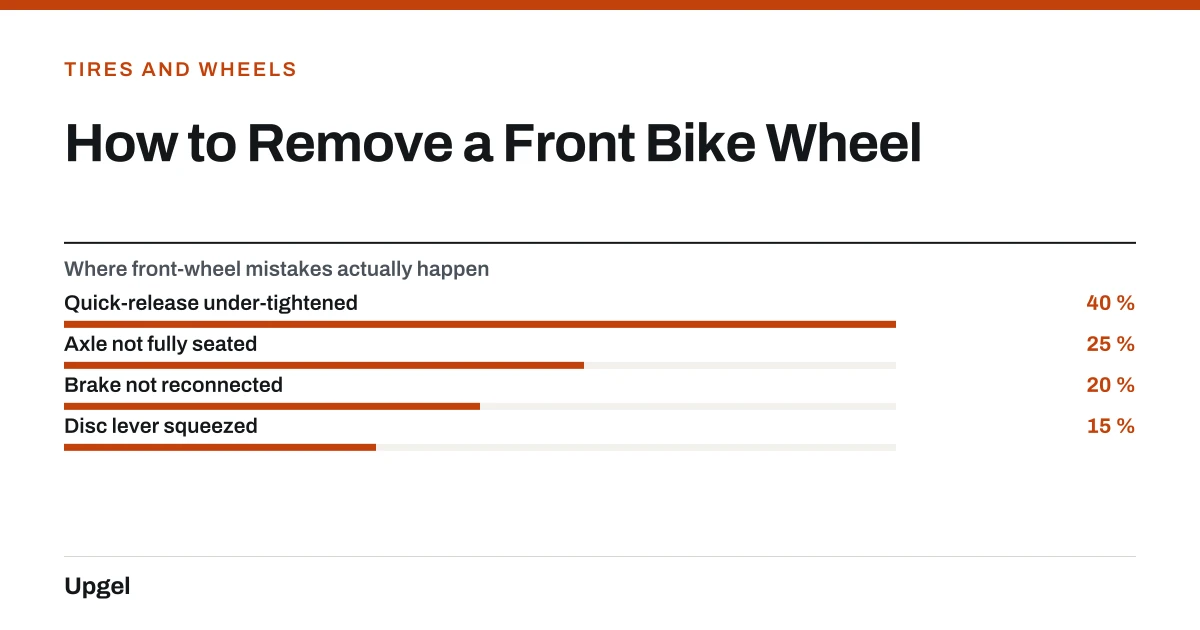
- Quick-release under-tightened40%
The serious one. Lever must be genuinely hard to close.
- Axle not fully seated25%
Wheel sits crooked and rubs the brake.
- Brake not reconnected20%
Discovered at the first junction. Always test before riding.
- Disc lever squeezed15%
Pistons closed; needs prising apart.
Frequently asked questions
Why won't my front wheel come off when the lever is open?
Because of the retention tabs on the fork dropouts. Flipping the lever is not enough — hold the lever and unscrew the nut on the opposite side four to six turns.
How tight should a quick-release be?
It should start to resist at the halfway point of the lever swing and need firm palm pressure to close, leaving a brief mark on your hand. If you can close it with two fingers it is too loose.
Which way should the quick-release lever point?
Alongside the fork leg or angled rearwards. Never forwards, where an obstacle could catch it and flip it open while riding.
What happens if I squeeze the brakes with the wheel off?
On disc brakes the pistons close on nothing and the pads meet. You will have to carefully prise them apart before the rotor fits back. Use a pad spacer when transporting the bike.
Sources
- 16 CFR Part 1512 — Requirements for Bicycles — eCFR, US Government
Supports: Section 1512.12(a) requiring a positive lock device on wheels, and 1512.12(c) requiring positive retention on front hubs without quick-release — verified against the section text.
- Bicycle Brakes — Sheldon Brown
Supports: How caliper, V-brake and cantilever brakes are released to clear an inflated tire.
- Tires and Tubes — Sheldon Brown
Supports: Why an inflated tire is wider than the rim brake pad gap and may need deflating.