How to Change a Bike Tire (Step-by-Step)
By Cal WhitmoreUpdated 8 min read
The short answer
Take the wheel off, let all the air out, and lever one side of the tire off the rim. Fit the new tire with the tube barely inflated, work the second bead on with your thumbs rather than levers, then inflate.
Key takeaways
- Deflate completely before you start — a tire with any air left in it will fight every lever you put near it.
- Two tire levers is the right number. A third usually means you are levering instead of pushing the bead into the rim's centre channel.
- Put 2–3 psi in the new tube before it goes in. That single step prevents most pinch flats caused during fitting.
- Match the number on the sidewall, not the wheel: a 700x25c tire needs a 700x23–28c tube, and the ETRTO number is the one that cannot lie.
Changing a bike tire is the single most useful repair to know, because it is the one that strands you. Everything else on a bike will usually let you limp home. A flat will not. The good news is that the job needs two tire levers, a pump and about fifteen minutes, and the technique barely changes whether you are working on a road bike, a hybrid or a kid's 20-inch wheel.
This guide covers the whole job: getting the wheel out, removing the tire, deciding whether you actually need a new tire or just a new tube, fitting everything back and seating the bead so it runs true. If you only need to swap the tube, the inner tube guide covers that shorter job.
What you need
- Two plastic tire levers. Steel levers will gouge an alloy rim and destroy a carbon one.
- A replacement tire and/or inner tube in the correct size.
- A pump with a gauge — a floor pump if you are at home, a mini-pump or CO2 for the roadside.
- Optional but useful: a rag, and a 15 mm wrench or 5 mm Allen key if your wheels are bolt-on rather than quick-release.
Step 1: get the wheel off
Shift into the smallest rear sprocket before you touch anything if you are working on the back wheel — it slackens the derailleur and gives the chain somewhere to sit. Open the brake if you have rim brakes, because the tire is wider than the gap between the pads. For a quick-release, flip the lever open and unscrew the far side a few turns. For a thru-axle, undo it fully and slide it out. Bolt-on wheels need a 15 mm wrench on each nut.
Step 2: deflate and lever the tire off
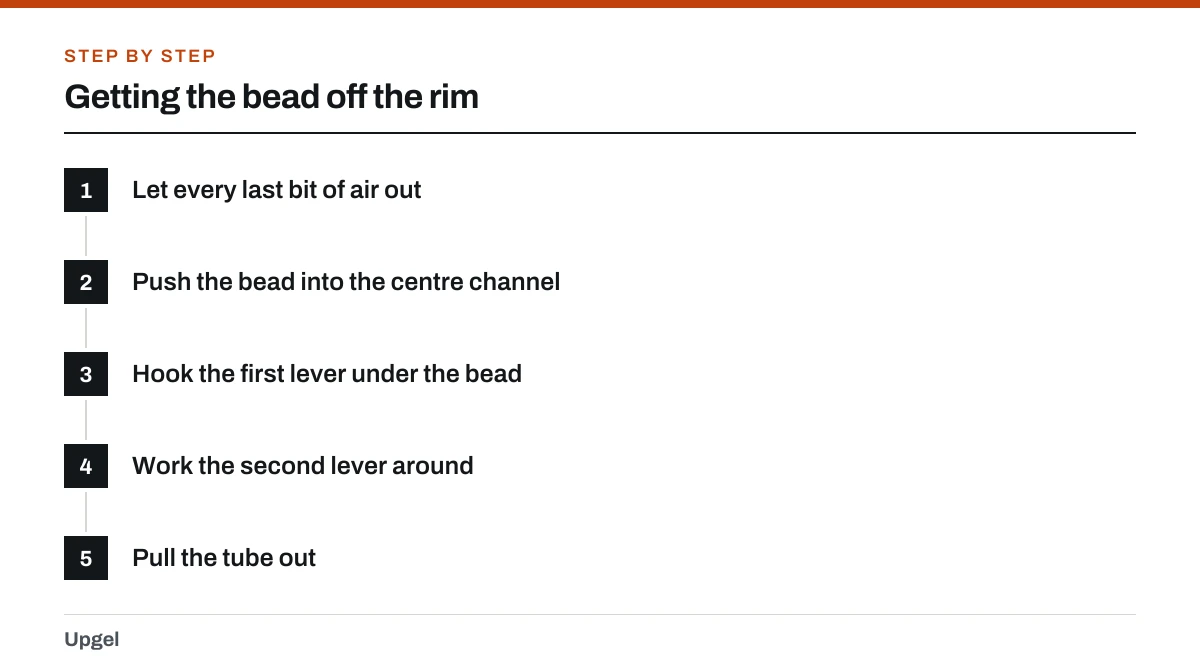
Getting the bead off the rim
Let every last bit of air out
Press the valve — Presta valves need the little knurled nut unscrewed first — and squeeze the tire flat all the way round. Any residual pressure holds the bead against the rim wall and makes the job far harder than it needs to be.
Push the bead into the centre channel
Work around the wheel squeezing both sides of the tire towards the middle of the rim. Rims are deeper in the centre, and that slack is what lets the bead come off. This is the step people skip, and it is the reason they end up needing three levers and a lot of swearing.
Hook the first lever under the bead
Insert it opposite the valve, hook the bead over the rim edge, and clip the other end to a spoke.
Work the second lever around
Place it a few inches away and slide it around the rim. Once six inches of bead is over the edge, the rest usually pulls off by hand.
Pull the tube out
Leave the second bead on the rim if you are only replacing the tube. Push the valve up through the rim hole last.
Step 3: decide — new tube, or new tire?
Before anything goes back on, run your fingers carefully around the inside of the tire. You are hunting for whatever caused the flat: a flint, a shard of glass, a thorn or a staple. If you fit a new tube over the object that killed the last one, you will be doing this again within a mile. Check the outside tread too.
| What you find | Replace | Why |
|---|---|---|
| A clean small hole in the tube, tire intact | Tube only | The tire has done its job. Patch or swap the tube and keep riding. |
| Two small holes side by side | Tube only, and add pressure | That is a pinch flat from hitting an edge at low pressure. The tire is fine. |
| Cut or split in the tread you can see daylight through | Tire | A cut that reaches the casing will keep cutting tubes. Boot it to get home, then replace. |
| Square profile, flat centre strip, or visible casing threads | Tire | Worn out. Grip and puncture resistance are both gone. |
| Sidewall cracks or bulges | Tire, immediately | A bulge is the casing failing. It can blow out under load. |
If the tire itself is done, our guide on how long bike tires last covers the four wear signs in more detail and gives realistic mileage figures for different tire types.
Step 4: fit the new tire and tube
Fitting without pinching the tube
Mount one bead
If the tire has a rotation arrow, point it in the direction of travel. Push one whole side of the tire onto the rim by hand. It should go on without tools.
Put a little air in the tube
Two or three strokes of a pump — just enough that the tube holds a round shape instead of lying flat. This is the single most effective way to avoid pinching it.
Seat the valve first
Push the valve straight through its hole so it sits square, not at an angle. Then tuck the rest of the tube up inside the tire all the way round.
Roll the second bead on
Starting at the valve, push the bead over the rim with your thumbs, working both directions. Keep pushing the already-fitted section into the centre channel to buy yourself slack.
Finish the last few inches by hand
This is where a lever pinches the tube. If it is genuinely too tight, deflate fully, re-check the bead is in the centre channel, and try again before reaching for a lever.
Step 5: inflate and check the bead
Inflate to roughly half the target pressure, then look at the moulded bead line that runs around the tire just above the rim edge. It should sit at a constant distance from the rim all the way around, on both sides. If it dips or bulges anywhere, let the air out, work that section with your thumbs, and try again. Inflating a badly-seated tire to full pressure is how people blow a tube off a rim with a bang loud enough to be mistaken for a gunshot.
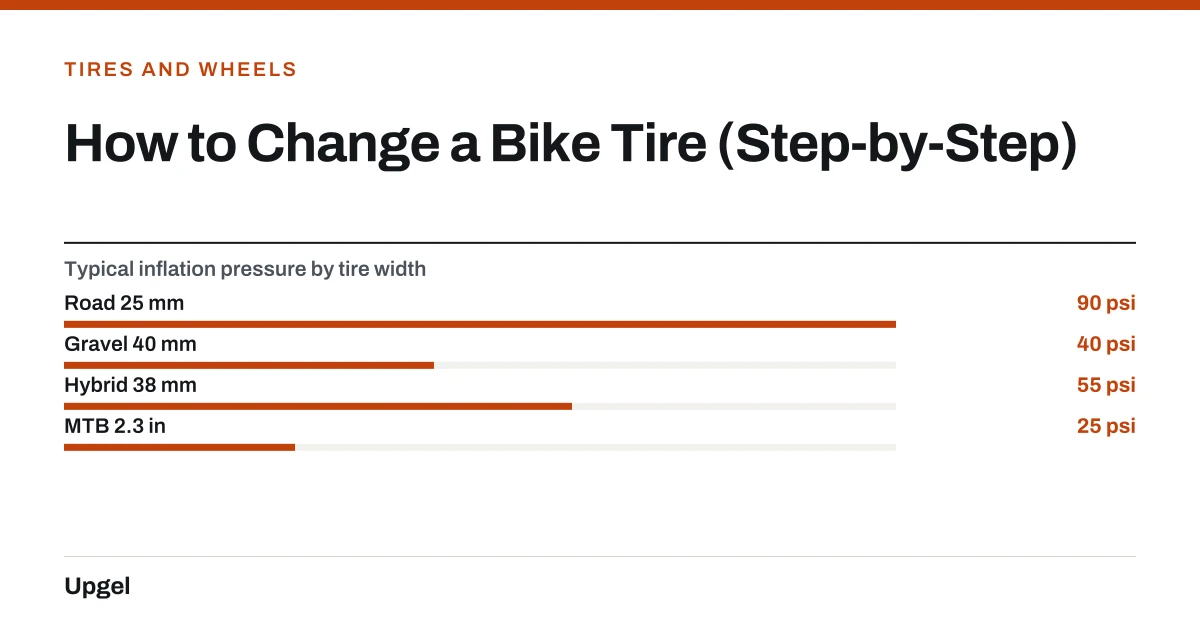
- Road 25 mm90psi
Narrow, high pressure. Drop 5–10 psi for rough tarmac.
- Gravel 40 mm40psi
Lower pressure buys grip and comfort on loose surfaces.
- Hybrid 38 mm55psi
The commuter middle ground.
- MTB 2.3 in25psi
Very low. Tubeless setups go lower still.
Refit the wheel, close the quick-release or torque the thru-axle, and re-connect the brake if you opened it. Spin the wheel and check it runs without rubbing. If your brakes now feel wrong, our guide to adjusting bike brakes walks through resetting pad clearance.
Common mistakes
- Levering the second bead on. This pinches the tube more often than not. Thumbs first, always.
- Not finding the cause. If the flint is still in the tire, the new tube lasts about a mile.
- Ignoring the rim tape. If it has slipped and a spoke hole is exposed, the tube will puncture from the inside. Replace the tape, not just the tube.
- Fitting the wrong tube. A 700c tube in a 26-inch tire will not seat properly even if you can force it in.
- Inflating hard before checking the bead line. That is how you get a blow-off.
The ETRTO/ISO number is the only tire size designation that is unambiguous.
Sheldon Brown, Tire Sizing Systems
Once you have done this two or three times it stops being a job and becomes a fifteen-minute inconvenience. If you want to go further, learning to patch a bike tube means you can carry one spare tube and still fix three flats on the same ride.
Frequently asked questions
How long does it take to change a bike tire?
About 15 minutes the first few times, and closer to 5–8 minutes once the sequence is familiar. Rear wheels take slightly longer than front because of the chain and derailleur.
Do I need to replace the tire or just the tube?
Just the tube, in most cases. Replace the tire itself only if you can see the casing threads, the tread has gone flat and square, or there is a cut or bulge in the sidewall.
Can I change a bike tire without tire levers?
Sometimes, on wide MTB tires with generous rims. On road tires it is very difficult. Two plastic levers cost a few dollars and save a lot of frustration — carry them.
What pressure should I inflate my bike tire to?
Use the range printed on the sidewall as your bounds. A 25 mm road tire typically runs 80–100 psi, a 40 mm gravel tire around 35–45 psi, and a 2.3 inch MTB tire around 22–28 psi, adjusted for rider weight.
Sources
- Tire Sizing Systems — Sheldon Brown
Supports: That the ETRTO/ISO marking is the unambiguous size designation, and how to read 25-622 style numbers.
- Tires and Tubes — Sheldon Brown
Supports: Bead seating, tube sizing tolerances, and why a partially inflated tube prevents pinching during fitting.
- Flat Tire Prevention and Repair — Sheldon Brown
Supports: Pinch-flat identification (paired holes) and the need to find the causing object before refitting.