How to Patch a Bike Tube Properly
By Cal WhitmoreUpdated 7 min read
The short answer
Find and mark the hole, scuff the area with the sandpaper from the kit, then spread a thin layer of cement and wait until it turns matt — three to five minutes. Press the patch on firmly from the centre outwards.
Key takeaways
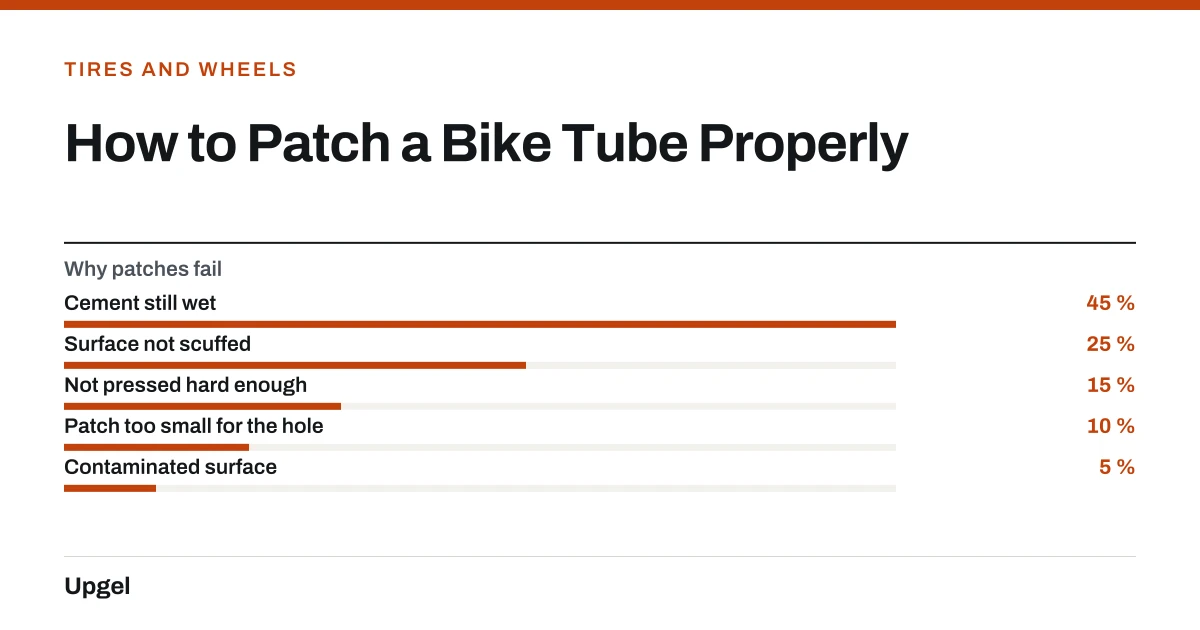
- The cement is not glue. It is a vulcanising solvent, and it must go touch-dry before the patch goes on. Applying a patch to wet cement is the single most common reason patches fail.
- Scuffing matters. Tubes come out of the mould with a release agent on them that nothing will stick to.
- Glueless patches are for the roadside. They work, but they are a temporary fix compared with a vulcanised patch.
- Do not patch a hole at the valve base or a split longer than about 6 mm. Replace the tube.
A patched tube gets a bad reputation it does not deserve. Done properly, a vulcanising patch fuses to the tube and is as strong as the surrounding rubber — the tube will fail somewhere else long before the patch lets go. Done impatiently, it peels off within a mile, which is where the reputation comes from. The difference is almost entirely about waiting for the cement to dry.
Finding the hole
Inflate the tube to roughly double its normal riding shape — fat, not hard. Then work through these in order of speed:
- Listen. Hold the tube close to your ear and rotate it slowly. A fresh puncture is usually audible.
- Feel. Pass the tube slowly past your cheek or the back of your wet hand. Moving air is easier to feel than hear.
- Water. Submerge sections in a bowl or bucket and look for a stream of bubbles. This finds anything.
While you have the tube out, note where the hole sits relative to the tire and check that spot on the casing. Our guide to fixing a flat bike tire explains what each hole position tells you about the cause.
Applying a vulcanising patch
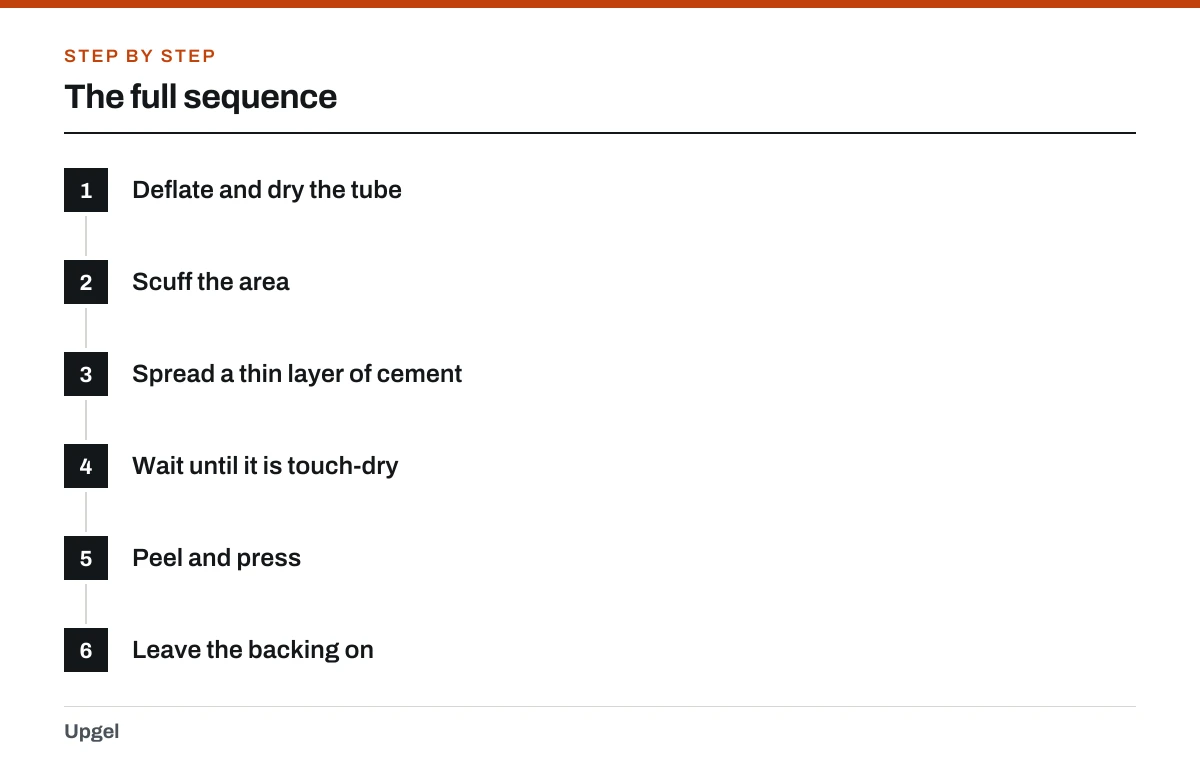
The full sequence
Deflate and dry the tube
Let the air out so the rubber is not stretched, and dry it completely if you used the water method.
Scuff the area
Use the sandpaper or metal scuffer in the kit. Abrade an area noticeably larger than the patch until the shine is gone and the surface is uniformly dull. Do not touch it afterwards — skin oil undoes this.
Spread a thin layer of cement
Squeeze a small blob on and spread it with a clean finger over an area larger than the patch. Thin and even, not a puddle.
Wait until it is touch-dry
Three to five minutes, longer in cold or damp conditions. It should look matt rather than glossy and feel tacky rather than wet. This is the step everyone rushes.
Peel and press
Peel the foil from the patch without touching the adhesive face. Place it centrally over the hole and press hard from the middle outwards for a full minute to drive out any trapped air.
Leave the backing on
The clear plastic film on top can stay. It will split naturally when the tube is inflated inside the tire. Peeling it can lift the patch edge.
Glueless patches
Glueless patches are pressure-sensitive adhesive discs. They need the same scuffing but no cement and no waiting, which makes them excellent for a cold roadside. They do not vulcanise — they stick. Over months, heat cycling and pressure will eventually work them loose.
| Vulcanising patch | Glueless patch | |
|---|---|---|
| Time to apply | 6–8 minutes including cure | Under a minute |
| Durability | Permanent in normal use | Weeks to months |
| Works when cold or damp | Poorly — cement needs warmth to flash off | Better, but the surface must be dry |
| Kit shelf life | Cement dries out once opened, ~1–2 years | Very long |
| Best for | Home repairs, building a stock of spares | Roadside, second flat of the ride |
When not to patch
- A tear at the base of the valve. There is no flat surface to bond to and the stress there is high.
- A split longer than roughly 6 mm, or any hole a standard patch cannot cover with a wide margin.
- Two holes very close together — a pinch flat. You can patch it, but a single patch spanning both is under more strain.
- A tube already carrying several patches, or one where the rubber has gone hard and shiny with age.
- Any hole on a latex or TPU tube unless the kit specifically says it supports that material. Standard cement does not bond well to either.
- Cement still wet45%
The patch floats on solvent instead of bonding.
- Surface not scuffed25%
Mould release agent prevents any bond forming.
- Not pressed hard enough15%
Air trapped under the patch centre.
- Patch too small for the hole10%
Needs a wide margin of bonded area all round.
- Contaminated surface5%
Fingers, water or talc on the scuffed area.
Once the patch is on, refit the tube using the sequence in our guide to changing a bike inner tube — slightly inflated, valve square, thumbs not levers.
Frequently asked questions
How long does a patched bike tube last?
A properly vulcanised patch is a permanent repair — the tube will typically fail elsewhere before the patch does. Glueless patches are better thought of as lasting weeks to months.
How long do I wait after applying rubber cement?
Three to five minutes in normal room conditions, until the cement looks matt rather than shiny and feels tacky rather than wet. Longer if it is cold or humid.
Can you patch a tube more than once?
Yes, as long as the patches do not overlap and the rubber is still supple. A tube with several patches is fine as a spare, though most people retire them eventually.
Why did my patch peel off?
Almost certainly the cement was still wet when the patch went on, or the tube was not scuffed. Both leave the patch stuck to a surface film rather than bonded to the rubber.
Sources
- Flat Tire Prevention and Repair — Sheldon Brown
Supports: Locating punctures by sound and water, and the scuff-cement-wait-press sequence for vulcanising patches.
- Tires and Tubes — Sheldon Brown
Supports: Tube materials and why standard rubber cement does not bond reliably to latex or TPU.
- Tire Sizing Systems — Sheldon Brown
Supports: Confirming the repaired tube is the correct size for the tire it is going back into.