How to Clean a Bike Cassette
By Cal WhitmoreUpdated 6 min read
The short answer
Run a thin rag between each pair of sprockets in a flossing motion, then scrub the tooth faces with degreaser and a stiff brush. Take the wheel out for access, and only remove the cassette if build-up is heavy.
Key takeaways
- The black paste between sprockets is mostly worn chain and road grit. It is abrasive, and it goes straight back onto a clean chain.
- Flossing with a rag between the cogs removes more than any amount of spraying.
- Do not forget the jockey wheels. They collect the same paste and are quicker to clean than anything else.
- Removing the cassette needs a lockring tool and a chain whip — worth owning if you clean thoroughly, not essential otherwise.
Cleaning your chain and leaving the cassette filthy is a bit like washing one hand. The chain runs across those sprockets constantly, and the black paste packed between them — worn chain particles, old lube and road grit — transfers straight back onto the links you just degreased.
Getting access
You can clean a cassette in place, but it is fiddly and you will get degreaser on the rotor. Taking the wheel out takes thirty seconds and makes the job far easier.
- Remove the rear wheel — the sequence is in removing a rear bike wheel.
- Lay the wheel flat, cassette side up, on something you do not mind getting dirty.
- On disc brakes, keep degreaser well away from the rotor. Better still, remove it or bag it — see cleaning brake rotors.
- Work over a tray or outdoors. This job produces a genuinely unpleasant amount of black run-off.
The floss-and-brush method
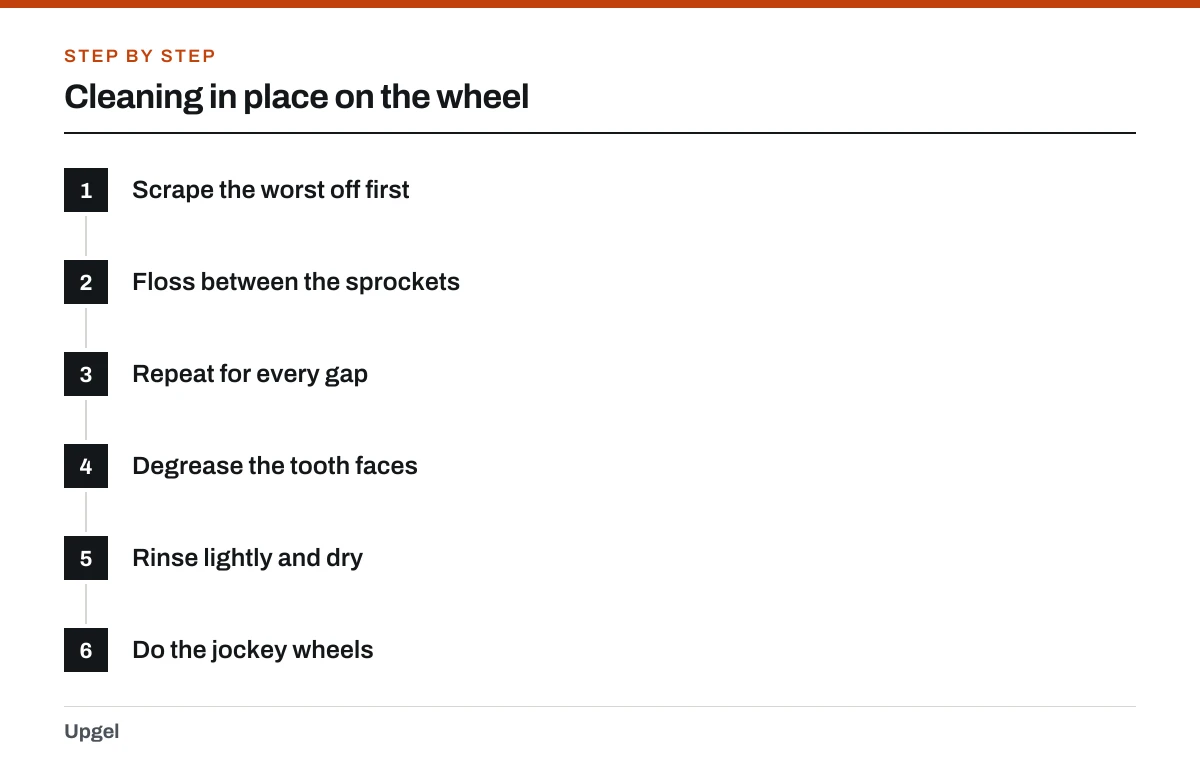
Cleaning in place on the wheel
Scrape the worst off first
A flat-bladed screwdriver or a purpose-made cassette scraper, run around each gap, lifts the packed paste out quickly. Do this dry — it is far more effective than trying to dissolve it.
Floss between the sprockets
Take a thin rag — an old T-shirt cut into strips works well — and run it into the gap between two cogs, then draw it back and forth around the circumference like dental floss. Rotate the wheel as you go.
Repeat for every gap
There are ten or eleven of them. It is tedious and it is the step that actually cleans the cassette.
Degrease the tooth faces
Apply degreaser and scrub with a stiff brush, working across the teeth rather than along them.
Rinse lightly and dry
Minimal water. Dry thoroughly — the sprockets are steel and will surface-rust within a day if left damp.
Do the jockey wheels
The two pulleys on the rear derailleur collect the same paste and take about a minute with a rag corner.
When to remove the cassette
Taking the cassette off gets it properly clean and lets you clean the freehub body underneath, which collects its own grime. It needs two specific tools.
| Tool | What it does | Needed? |
|---|---|---|
| Cassette lockring tool | Engages the splined lockring | Yes — must match your cassette brand |
| Chain whip | Holds the sprockets still against the lockring's torque | Yes for removal, not for refitting |
| Large adjustable wrench or socket | Turns the lockring tool | Yes |
| Torque wrench | Refitting the lockring to spec, typically 30–50 Nm | Recommended |
- Worth removing when the build-up is heavy enough that flossing is not shifting it.
- Worth removing when you are replacing the cassette anyway — check wear at the same time as chain wear, per replacing a bike chain.
- Worth removing if the freehub sounds gritty or the sprockets have visible play.
- Not worth removing as a routine cleaning step. The tools cost more than the benefit for most riders.
- Note the order and any spacers as they come off. Sprockets often have a wide spline to key them in one orientation only.
Checking wear while it is clean
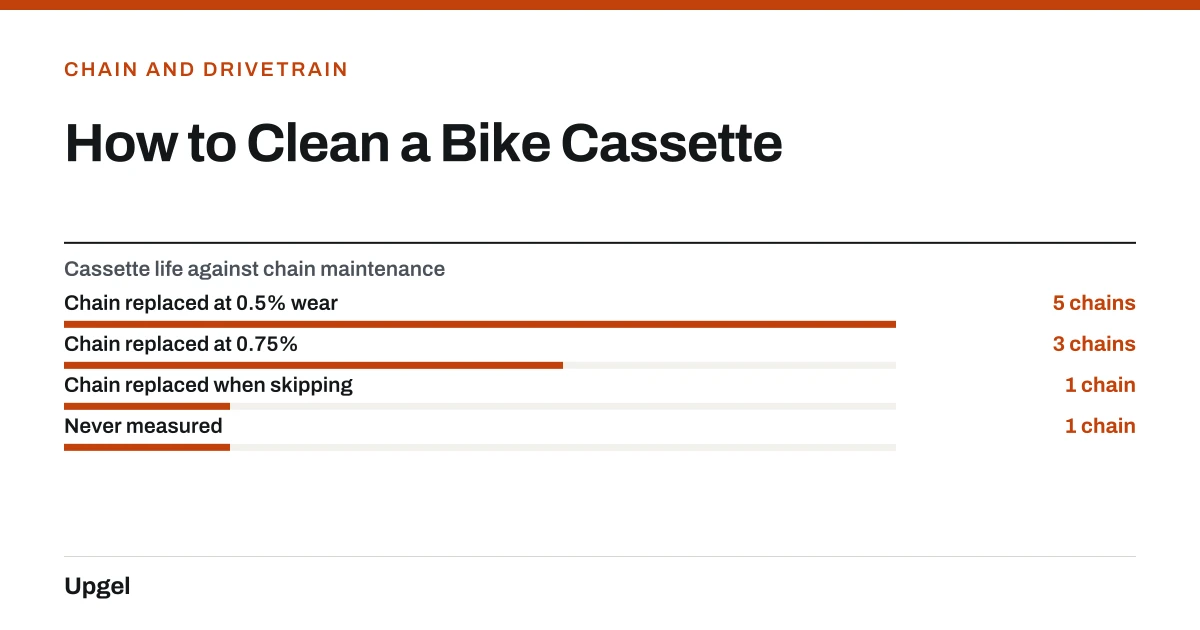
A cassette is far easier to inspect clean than dirty. Look at the tooth profile on the sprockets you use most — typically the middle of the range.
- Chain replaced at 0.5% wear5chains
One cassette outlasts several chains.
- Chain replaced at 0.75%3chains
Still reasonable.
- Chain replaced when skipping1chain
Cassette dies with the chain.
- Never measured1chain
Plus chainrings, usually.
- Healthy teeth are symmetrical, with a rounded peak.
- Worn teeth develop a hooked, shark-fin profile, leaning in the direction of drive.
- If a new chain skips on a cleaned cassette under load, the cassette is worn out regardless of how it looks.
- Wear concentrates on the sprockets you use most, so check those rather than the extremes.
Frequently asked questions
How do I clean between the sprockets on a cassette?
Cut a thin rag into strips, push a strip into the gap between two sprockets, and draw it back and forth around the circumference like flossing. Repeat for every gap.
Do I need to remove the cassette to clean it?
Usually not. Flossing and brushing in place removes most of the build-up. Remove it when the deposit is heavy, when replacing it, or to clean the freehub underneath.
What tools do I need to remove a bike cassette?
A cassette lockring tool matched to your brand, a chain whip to hold the sprockets, and a large wrench. A torque wrench for refitting to around 40 Nm is worth having.
How do I know if my cassette is worn out?
Look for hooked, shark-fin shaped teeth on the sprockets you use most. The definitive test is whether a new chain skips under load on a clean cassette.
Sources
- Chains — Sheldon Brown
Supports: How worn chains wear sprocket teeth into a hooked profile, and the abrasive nature of drivetrain deposits.
- Bicycle Tools — Sheldon Brown / Harris Cyclery
Supports: Cassette lockring tools and chain whips, and why both are required for removal.
- A novel model for bicycle drivetrain efficiency — Sports Engineering · DOI 10.1007/s12283-025-00505-8
Supports: That drivetrain condition affects measured efficiency, though the practical gains from cleaning are modest.