How to Repair a Tubeless Bike Tire
By Cal WhitmoreUpdated 7 min read
The short answer
Most tubeless punctures seal themselves — spin the wheel so sealant reaches the hole. If it keeps leaking, push a plug in from the outside and trim it flush. For larger cuts, boot the tire and fit an inner tube.
Key takeaways
- Escalate in order: let sealant work, then plug, then boot and tube. Skipping to the tube wastes a repair that would have taken 30 seconds.
- Sealant dries out. Most latex-based sealants need topping up every two to six months depending on climate.
- Remove the valve core before adding sealant — it is far quicker than pouring it past the bead.
- Once you fit a tube into a tubeless tire, get the sealant off the rim tape and inspect it. Wet sealant and tube rubber do not get along.
The point of a tubeless setup is that most punctures never become events. Sealant finds the hole, plugs it from the inside, and you notice a brief hiss and a spray of white before carrying on. When that does not happen, you have a ladder of increasingly involved repairs, and the trick is not to skip rungs.
The repair ladder
| Damage | Fix | Time |
|---|---|---|
| Small tread puncture, still sealing | Spin the wheel, keep the hole at the bottom, reinflate | 30 seconds |
| Hole up to ~3 mm, will not seal | Tubeless plug from the outside | 2 minutes |
| Hole 3–6 mm | Larger plug, or two plugs together | 3 minutes |
| Cut over ~6 mm, or a sidewall cut | Boot from inside plus an inner tube | 10 minutes |
| Sidewall torn or casing delaminated | New tire | — |
Sealant: the part people forget
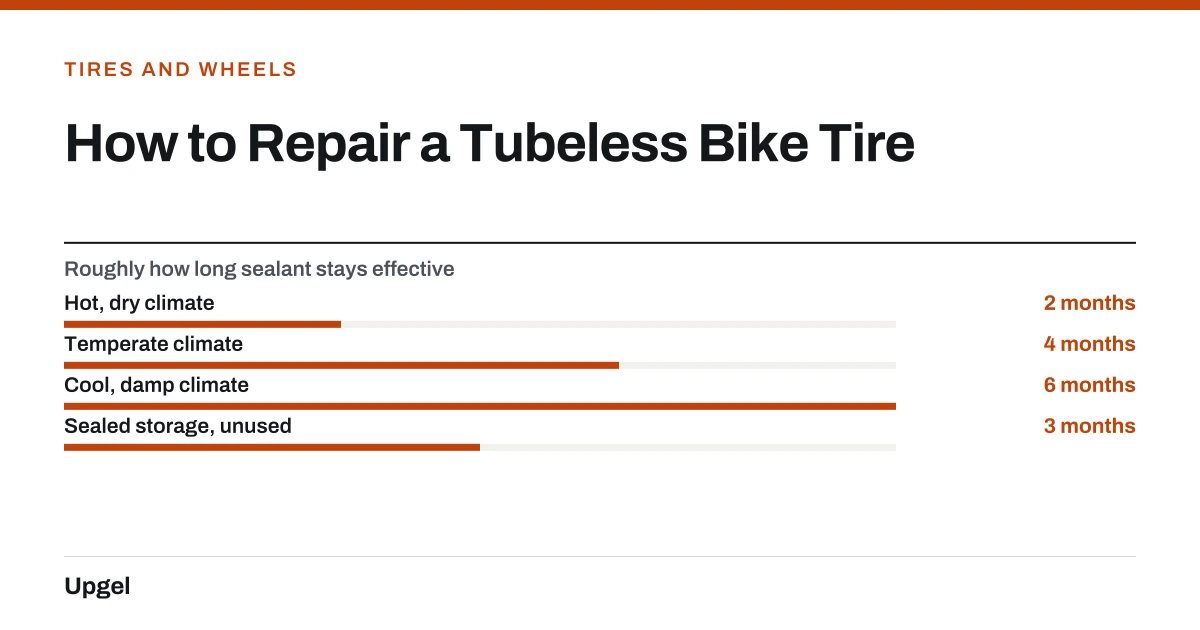
Sealant is a consumable. Latex-based sealants dry out as the ammonia carrier escapes through the tire, leaving rubbery lumps that seal nothing. A tire that has been up for eight months has, in most climates, no working sealant left in it — which is why people conclude tubeless does not work when in fact it was never charged.
- Hot, dry climate2months
Evaporates fastest. Check monthly in summer.
- Temperate climate4months
The common case for most riders.
- Cool, damp climate6months
Slowest to dry out.
- Sealed storage, unused3months
Sitting still does not preserve it.
Topping up sealant
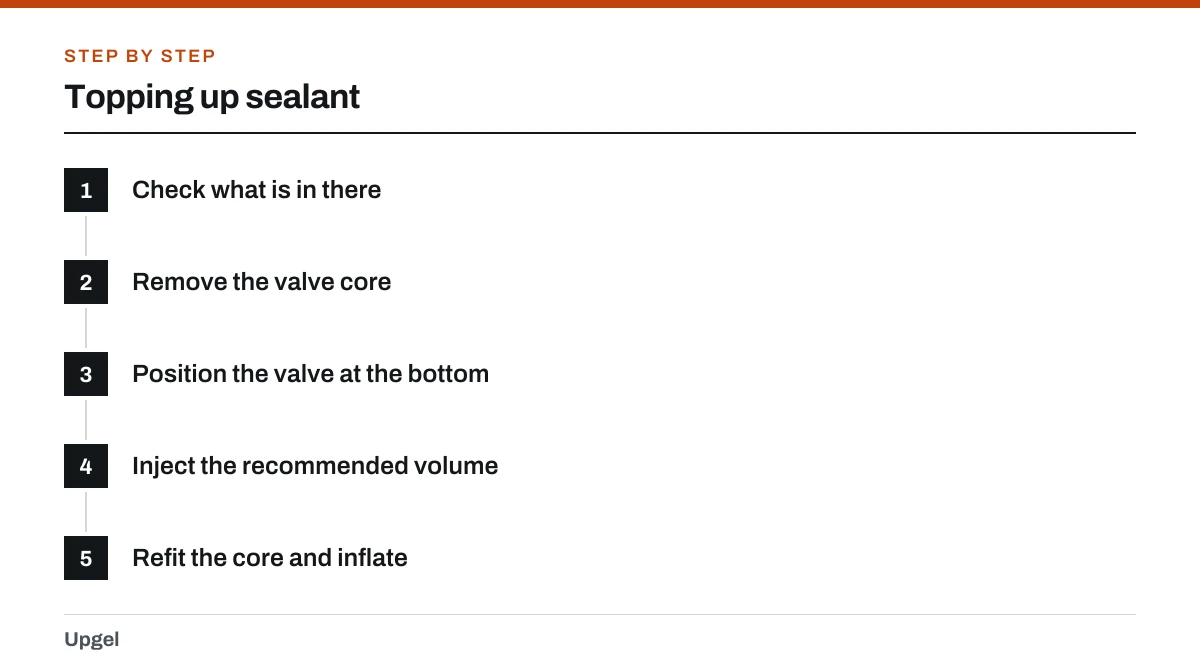
Check what is in there
Remove the valve core and dip a cable tie or spoke into the tire. If it comes out with liquid on it you have sealant; if it comes out dry, you do not.
Remove the valve core
Use a valve core tool, or the notch on many tubeless valve caps. Keep the core somewhere you will not lose it.
Position the valve at the bottom
Rotate the wheel so the valve is low, so what you inject stays in rather than running back out.
Inject the recommended volume
Typically 60 ml for a road tire, 90–120 ml for a mountain bike tire. Check the sealant maker's figure for your tire width.
Refit the core and inflate
Then spin and shake the wheel to spread sealant around the whole casing.
Plugging a hole
A tubeless plug is a strip of sticky rubber pushed into the hole with a forked insertion tool. It is not a temporary bodge — plenty of plugged tires run to the end of their normal life without further attention.
Fitting a plug
Find the hole
Look for escaping sealant or bubbles. Leave any thorn or shard in place until you are ready — it marks the spot.
Remove the object
Pull it out with pliers or your fingers. Air will start escaping; that is expected.
Load the tool
Thread a plug halfway through the forked insertion tool so equal lengths hang either side.
Push it in firmly
Drive the tool into the hole until roughly two-thirds of the plug is inside, then pull the tool straight out. The fork releases the plug and leaves it behind.
Reinflate and check
Pump the tire back up. Sealant plus plug should close it. Trim the protruding tails flush with a knife once it holds.
Fitting a tube as a last resort
When nothing else works, a tubeless tire will accept an ordinary inner tube. Remove the valve, get one bead off using the technique in our guide to removing and installing a bike tire, boot any large cut from the inside, and fit the tube exactly as you would on a normal setup — the sequence is in how to change a bike inner tube.
- Wipe out as much wet sealant as you can first. It makes an unpleasant mess and can attack tube rubber over time.
- Check the rim tape has not lifted. Tubeless tape doubles as rim tape, and a lifted edge will puncture the tube.
- Carry a tube even on a tubeless bike. It is the only fix for damage beyond plugging.
- At home, decide whether the tire is worth re-sealing tubeless or should be replaced.
Frequently asked questions
How often should I top up tubeless sealant?
Every two to six months depending on climate. Check by removing the valve core and dipping a spoke or cable tie into the tire — if it comes out dry, top up.
Can you put an inner tube in a tubeless tire?
Yes. Remove the tubeless valve, clean out what sealant you can, and fit a tube normally. It is the standard get-home fix for damage too big to plug.
How big a hole can a tubeless plug fix?
Reliably up to about 3 mm in the tread, and up to roughly 6 mm using a larger plug or two together. Beyond that, or anywhere on the sidewall, boot it and fit a tube.
Why won't my tubeless tire seal?
Usually the sealant has dried out, or the hole is at the top of the wheel where no sealant is pooling. Check sealant first, then rotate the hole to the bottom and spin.
Sources
- Tires and Tubes — Sheldon Brown
Supports: Tire casing construction and why sidewalls behave differently from tread under repair.
- Tire Sizing Systems — Sheldon Brown
Supports: Matching a replacement tube or tire to the rim when converting a tubeless wheel back to tubes.
- Flat Tire Prevention and Repair — Sheldon Brown
Supports: That tubeless setups remove pinch flats, which are identified by paired holes on a tubed wheel.