How to Remove a Bike Chain Link
By Cal WhitmoreUpdated 7 min read
The short answer
Seat the chain in the outer cradle of a chain tool with the driver centred exactly on the rivet, then wind the handle to push it out. Remove links in inner-plus-outer pairs so the two ends still mate.
Key takeaways
- Chains alternate inner and outer links. Remove them in pairs or the ends will not join.
- One full link — an inner plus an outer — is one inch, because bicycle chain pitch is half an inch per plate.
- Centre the driver on the rivet. Off-centre pressure bends the side plate and ruins the link permanently.
- Never push a rivet all the way out on a chain you intend to rejoin with that same rivet.
Shortening a chain comes up more often than people expect: fitting a new chain, converting to singlespeed, replacing a damaged section, or adapting after changing a cassette or chainring. The mechanics are simple. The part that catches people out is the counting.
How a chain is put together
A bicycle chain alternates two kinds of link. Inner links have narrow plates with rollers between them. Outer links have wider plates that sit outside the inner ones, joined by rivets. They must alternate — an inner link cannot connect to another inner link.
| Term | What it means |
|---|---|
| Pitch | Half an inch between rivet centres — standard on every derailleur bicycle chain |
| One 'link' (common usage) | One inner plus one outer = one inch, two rivets |
| Half link | A single plate pair, half an inch |
| Typical new chain | 114 or 116 links as sold |
| Wear measurement | 24 links should span exactly 12 inches when new |
Working out how many to remove
Getting the length right
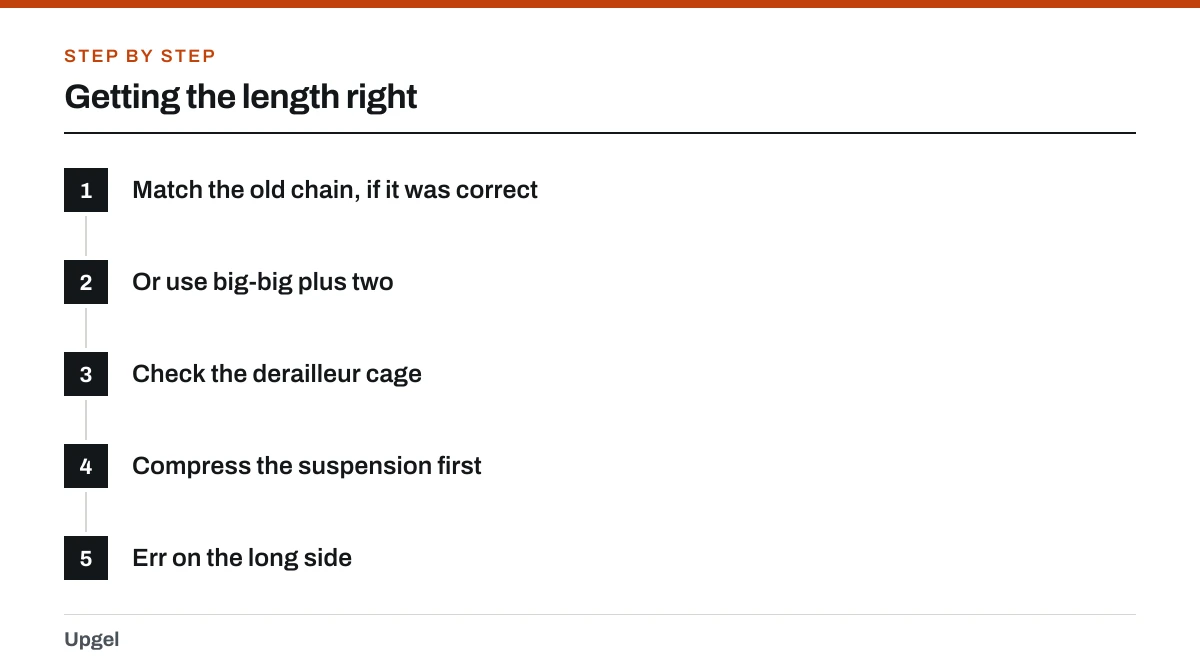
Match the old chain, if it was correct
Lay old and new side by side, align one end, and count. Fastest method by far when the old length worked.
Or use big-big plus two
Wrap the chain over the largest chainring and largest sprocket, bypassing the derailleur. Pull the ends until they just meet, then add two links.
Check the derailleur cage
Fitted properly, the cage should be stretched but not straining in big-big, and should not sag against itself in small-small.
Compress the suspension first
On a full-suspension bike, the chainstay lengthens through the travel. Size with the suspension compressed or follow the maker's method.
Err on the long side
A chain one link too long shifts slightly less crisply. A chain one link too short can destroy a rear derailleur.
Pushing the rivet out
Using the chain tool
Choose the right cradle
Chain tools have two. The one further from the driver is for pushing rivets out. The near cradle is only for freeing stiff links afterwards.
Seat the chain squarely
The rivet you are pushing must sit centred in the cradle, with the chain flat and not twisted.
Line the driver up precisely
Wind the handle until the driver tip just touches the rivet. Look at it from both sides — it must be dead centre. This is where links get ruined.
Wind steadily
Firm, even turns. If it suddenly gets much harder, stop and check alignment rather than forcing it.
Stop before the rivet leaves the far plate
On a reusable chain, leave the rivet just engaged in the outer plate so you have something to push back through. On Shimano, push right out and use a new joining pin.
Flex the chain apart
A gentle sideways flex separates the plates.
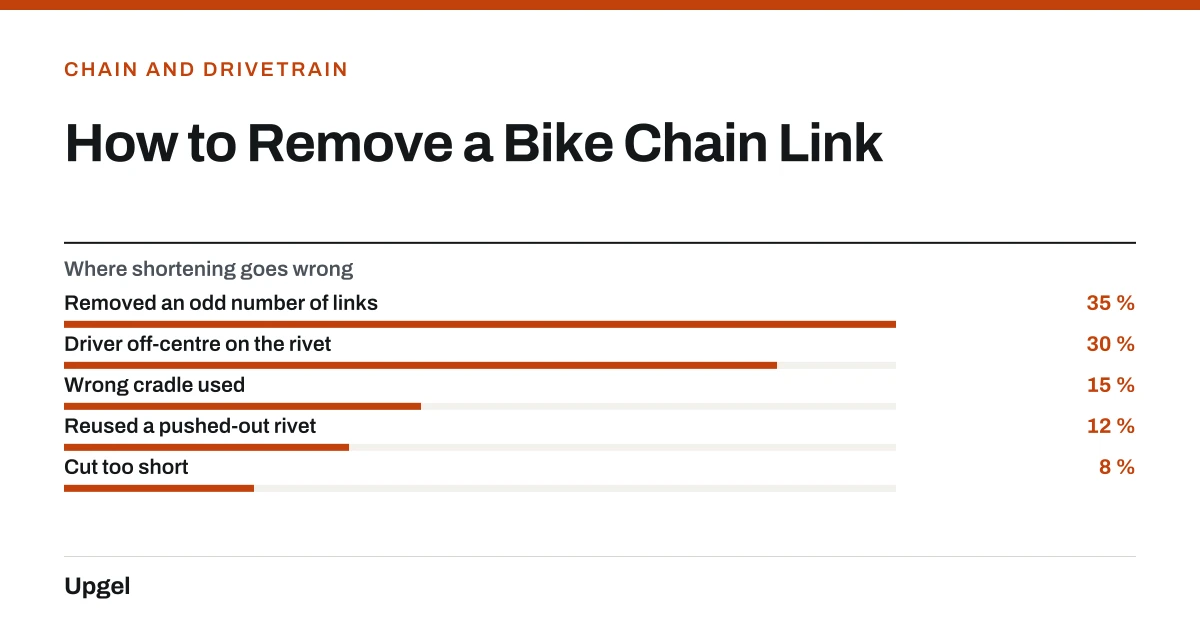
- Removed an odd number of links35%
Ends will not mate. Remove inner+outer pairs.
- Driver off-centre on the rivet30%
Bends the side plate. That link is scrap.
- Wrong cradle used15%
The near cradle is for stiff links only.
- Reused a pushed-out rivet12%
Weak joint. Use a quick link.
- Cut too short8%
Expensive if it reaches the derailleur.
Rejoining
A quick link is the best option in almost every case: stronger than a reused rivet, faster to fit, and it makes every future chain clean far easier. Match it to your chain's speed count, slot both pins through the keyholes, and pull the chain apart firmly until it clicks audibly into place.
- Check the joined link is flat and flush with its neighbours, and that it flexes as freely as the rest.
- If you pushed a rivet back in instead, expect a stiff link — free it using the near cradle, as covered in fixing a bike chain.
- Run the chain through every gear by hand before riding.
- Removing the whole chain, rather than just shortening it, is covered in removing a bike chain.
- If you have no chain tool at all, the quick-link workarounds are in removing a bike chain without a chain tool.
Frequently asked questions
How many links should I remove from a bike chain?
Always an even number of plate pairs — one inner plus one outer at a time, which is one inch. Removing an odd number leaves two ends of the same type that cannot join.
Which side of the chain tool do I use?
The cradle furthest from the driver pushes rivets out. The near cradle is only for spreading the plates of a stiff link after rejoining.
Can I reuse the pin I pushed out?
On most non-Shimano chains you can, if you left it engaged in the far plate. Shimano chains require a new joining pin. A quick link is stronger and simpler than either.
What happens if I make the chain too short?
Shifting into the largest chainring and largest sprocket can over-extend and destroy the rear derailleur, sometimes taking the hanger and wheel with it. Always err slightly long.
Sources
- Chains — Sheldon Brown
Supports: Half-inch chain pitch, inner and outer link alternation, chain tool cradle functions, and rivet reuse limitations.
- Bicycle Tools — Sheldon Brown / Harris Cyclery
Supports: Chain tool construction and why driver alignment on the rivet centre determines whether the link survives.
- Derailer Adjustment — Sheldon Brown
Supports: That chain length affects rear derailleur cage geometry across the gear range.