How to Remove Bike Pedals
By Cal WhitmoreUpdated 7 min read
The short answer
The right pedal unscrews counter-clockwise; the left is reverse-threaded and unscrews clockwise. The rule that always works: with the wrench on the pedal, both loosen when you turn it towards the back of the bike.
Key takeaways
- The left pedal is reverse-threaded. This is the single fact that decides whether the job takes two minutes or ruins a crank.
- Both pedals loosen towards the rear of the bike. That rule works on either side without thinking about thread direction.
- Pedals self-tighten as you ride, so a pedal that has been on for years can be extremely tight. Use leverage, not force.
- Grease the threads before refitting. A dry pedal thread in an alloy crank can seize permanently.
Removing pedals is genuinely easy, and it is also the job that produces more stripped crank arms than any other piece of home bicycle maintenance. The reason is a single design detail that nobody mentions until you have already forced something the wrong way.
The left pedal is backwards
The right-hand pedal has a conventional right-hand thread: counter-clockwise to loosen, like every other bolt on the bike. The left-hand pedal has a left-hand thread: it loosens clockwise.
This is not an inconvenience, it is what stops your left pedal falling out. As you pedal, friction between the pedal axle and the bearing tries to rotate the axle within the crank thread — a process called precession, which turns the axle in the direction that would unscrew a conventional thread. Reversing the left thread means that same effect tightens it instead.
| Pedal | Thread | To loosen | Marking |
|---|---|---|---|
| Right (drive side) | Right-hand / normal | Counter-clockwise | Often stamped R |
| Left (non-drive side) | Left-hand / reverse | Clockwise | Often stamped L |
What you need
- A 15 mm pedal wrench — long, thin and specifically shaped to fit the flats on a pedal axle. A standard 15 mm spanner is usually too thick and too short.
- Or an 8 mm Allen key, if your pedals take one through the back of the crank arm. A long-handled one, ideally.
- Grease, for refitting. Not optional.
- A rag, because pedal threads collect a remarkable amount of grime.
Removing them
Step by step
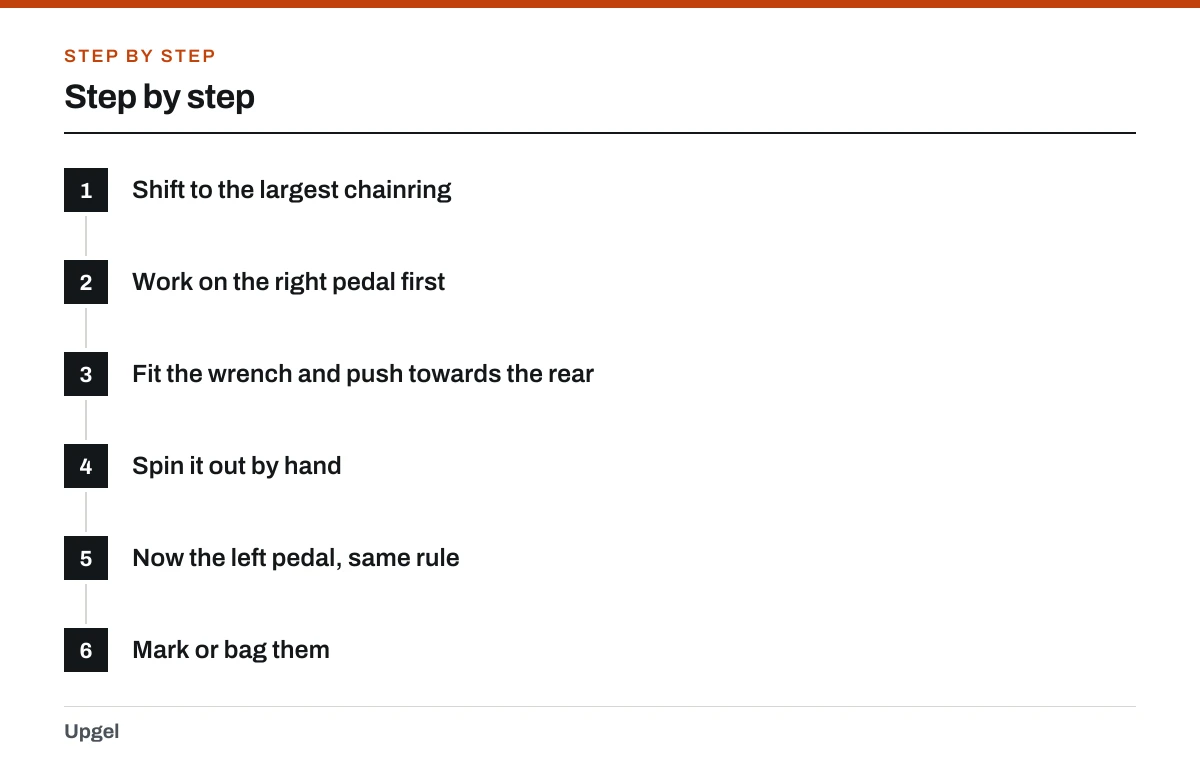
Shift to the largest chainring
If your hand slips, it lands on the flat of the chainring rather than being raked across the teeth. This costs nothing and saves the occasional stitches.
Work on the right pedal first
Position the right crank arm forwards, roughly horizontal, so you have room to pull.
Fit the wrench and push towards the rear
Hold the opposite crank or the frame for counter-pressure. Push steadily rather than jerking.
Spin it out by hand
Once it breaks free it should unwind easily. If it stays tight all the way, the threads are corroded — see the section below.
Now the left pedal, same rule
Wrench on, turn towards the rear of the bike. On this side that is clockwise, which will feel wrong. It is correct.
Mark or bag them
Pedals are usually stamped L and R on the axle end. If yours are not, label them — fitting a left pedal into a right crank will destroy the crank thread.
Freeing a seized pedal
Pedals self-tighten every time you ride, and a steel axle in an aluminium crank arm will corrode into place given a few damp years. A pedal that has never been removed can be very tight indeed.
- Get more leverage. A longer pedal wrench, or a length of pipe over the handle, multiplies your force without you having to jerk at it.
- Apply penetrating oil at the join between axle and crank, and give it several hours — overnight is better. Reapply once or twice.
- Use body weight rather than arm strength. With the crank arm horizontal and the wrench pointing forward, press down slowly and steadily.
- Steady pressure beats sudden force. A sharp yank is what rounds off the wrench flats and turns a difficult job into a very difficult one.
- Heat is a last resort and a risky one — it can damage bearings, paint and any carbon nearby. At this point a bike shop with a proper vice is cheaper than the parts you are about to break.
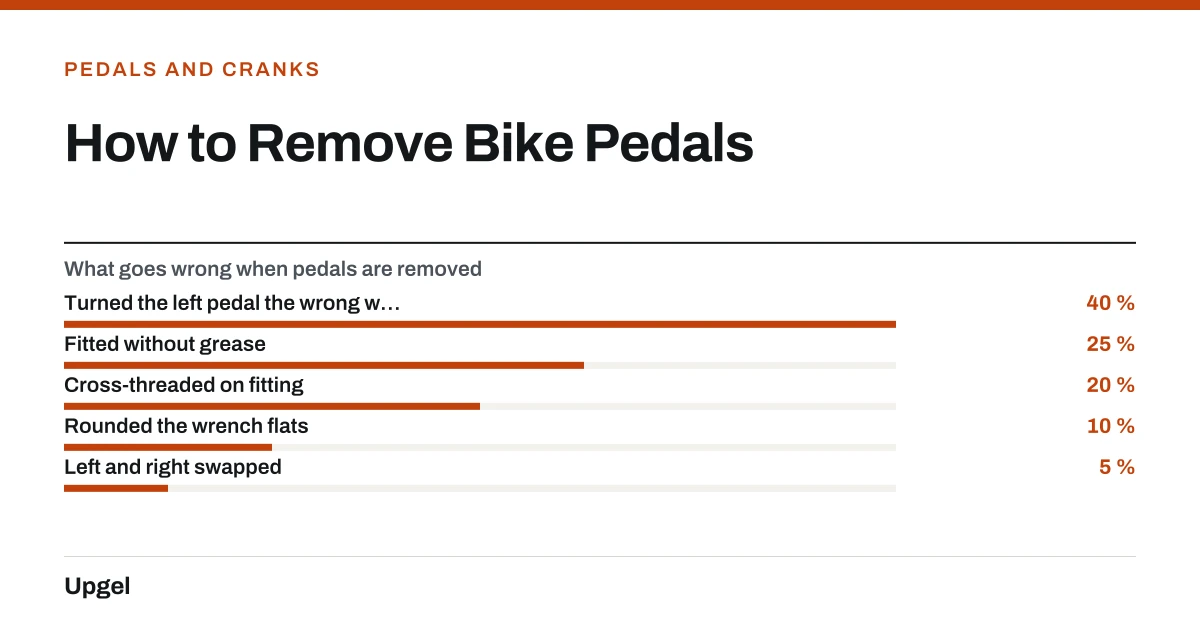
- Turned the left pedal the wrong way40%
Strips the crank arm. Usually terminal.
- Fitted without grease25%
Seizes for whoever removes it next.
- Cross-threaded on fitting20%
Always start the thread by hand.
- Rounded the wrench flats10%
From jerking instead of steady pressure.
- Left and right swapped5%
Destroys the crank thread immediately.
Before you put them back
Clean both threads and grease the axle threads properly before refitting. A dry steel axle in an alloy crank will corrode, and the person who has to remove it next — quite possibly you — will not enjoy it. The full fitting procedure, including how to avoid cross-threading, is in installing bike pedals.
Pedals are also worth a periodic check as part of a general going-over — see tuning up a bike. If you are taking pedals off in order to get at the crank itself, that is a different job with its own specific tool: see removing a bike crank.
Frequently asked questions
Which way do bike pedals unscrew?
The right pedal unscrews counter-clockwise; the left unscrews clockwise because it is reverse-threaded. The simplest rule is that both pedals loosen when you turn the wrench towards the back of the bike.
Why is the left bike pedal reverse-threaded?
Friction in the bearing tries to rotate the axle within the crank thread as you pedal — an effect called precession — which would gradually unscrew a normal thread on the left side. Reversing the thread means the same effect tightens it.
What size wrench do I need for bike pedals?
A 15 mm pedal wrench for pedals with flats on the axle, or an 8 mm Allen key for those that take one through the back of the crank arm. Some pedals accept either.
How do I remove a seized bike pedal?
Apply penetrating oil at the axle-to-crank join and leave it several hours, then use a longer wrench or a pipe over the handle for leverage. Use steady pressure rather than sudden force, and check the direction before pushing harder.
Sources
- Pedals — Sheldon Brown
Supports: Left pedal reverse threading, the precession mechanism behind it, and pedal wrench sizing.
- Bicycle Tools — Sheldon Brown / Harris Cyclery
Supports: Why a purpose-made pedal wrench is required rather than a standard 15 mm spanner.
- Cranks — Sheldon Brown
Supports: Aluminium crank arm threads and the damage caused by cross-threading or forcing a steel axle.