How to Change a Bike Seat
By Cal WhitmoreUpdated 7 min read
The short answer
Record your saddle height, setback and tilt before touching anything. Loosen the clamp bolts, fit the new saddle within its rail markings, restore that position, then torque the clamp to 5 to 8 Nm.
Key takeaways
- Record the old position first. Saddles differ in height, so you will need to re-measure anyway, but the numbers give you a reference.
- Rail types are not universal. Round 7 mm rails are standard; oval and carbon rails need a compatible clamp.
- Clamp only within the marked section of the rails. Clamping outside it can snap them.
- Saddle height is measured to the top of the saddle, so a thicker saddle changes your fit even at the same post height.
Changing a saddle is a ten-minute job. The part people get wrong is not the mechanics — it is losing a fit position that took months to settle, because they did not write anything down before undoing the bolt.
Record your position first
Do this before touching a single bolt. Three measurements, two minutes.
| Measurement | How to take it | Why |
|---|---|---|
| Saddle height | Bottom bracket centre to the top of the saddle, along the seat tube | The number that matters most |
| Setback | Drop a plumb line from the saddle nose; measure to the bottom bracket centre | Fore-aft position |
| Tilt | Spirit level or phone level along the saddle top | Usually level, but record what you had |
| Post insertion | Mark the seatpost with tape at the frame | A quick way back if all else fails |
| Rail position | Note where the clamp sits along the rails | Gets you close on the new saddle |
Making sure the new saddle fits
Almost all saddles fit almost all seatposts, but there are real exceptions worth checking before you order.
- Round 7 mm rails are the standard and fit essentially every clamp.
- Oval or carbon rails — typically 7×9 mm — need a clamp designed for them. A round clamp crushes carbon rails and can crack them.
- Rail spacing is standardised enough that it rarely causes problems, but very wide or narrow saddles occasionally foul a clamp.
- Integrated or proprietary posts on some bikes take only specific saddles or need an adapter.
- Width matters for comfort rather than fit — it should suit your sit bone spacing, which is covered in why bike seats are uncomfortable.
The two clamp styles
| Style | Looks like | Adjusting tilt |
|---|---|---|
| Single bolt | One bolt, often vertical, through a cradle | Loosen, tilt by hand, retighten. Coarse — sometimes serrated, so tilt comes in steps |
| Twin bolt | Two bolts, front and rear | Loosen one, tighten the other. Fine and repeatable, but both must end up torqued |
Swapping the saddle
Step by step
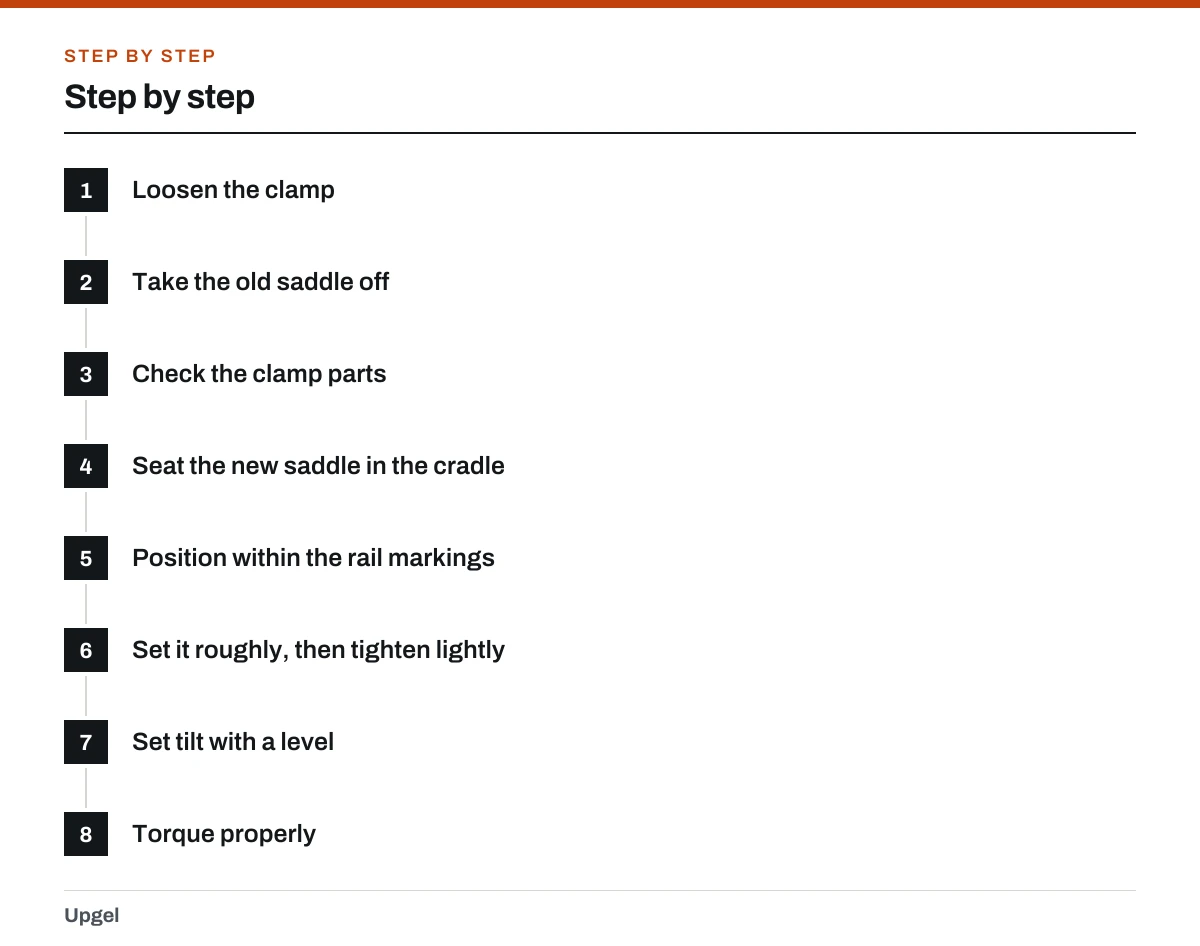
Loosen the clamp
One bolt, or both on a twin-bolt post. On a single-bolt clamp you often need to loosen it enough that the cradle halves separate.
Take the old saddle off
On a single-bolt clamp the top cradle piece may come free — catch it, and note which way round it sits.
Check the clamp parts
Clean them, and look at any serrations for wear. Grease the bolt threads lightly; it stops creaking and seizing.
Seat the new saddle in the cradle
Rails sitting squarely in the grooves, both sides even.
Position within the rail markings
Most rails have marked limits — often a straight section with lines at each end. The clamp must sit inside them. Clamping on a curved or unmarked section can snap a rail.
Set it roughly, then tighten lightly
Enough to hold position while you check, not final torque.
Set tilt with a level
Level is right for most riders. Adjust and re-check — clamps often shift slightly as they tighten.
Torque properly
Usually 5–8 Nm; check the post or saddle. On twin-bolt clamps alternate between the two so the cradle stays even.
Restoring your position
A new saddle almost never has the same thickness or shape as the old one, so your recorded seatpost height will not reproduce your old fit exactly.
- Set saddle height by measuring to the top of the new saddle, matching your recorded figure — not by matching the seatpost insertion depth.
- Restore setback using the plumb line from the saddle nose.
- Set tilt level, then adjust from there if needed.
- Check the seatpost minimum insertion mark is still inside the frame.
- Ride it for two or three rides before judging. New saddles feel wrong initially even when they are right.
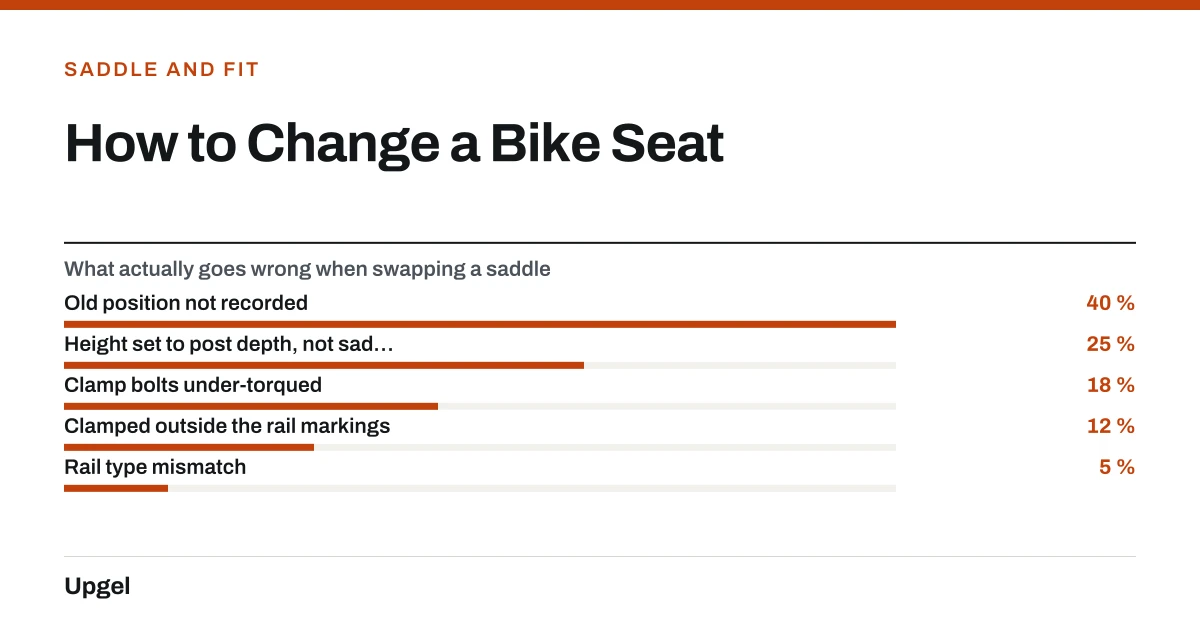
- Old position not recorded40%
Weeks of guessing to get back.
- Height set to post depth, not saddle top25%
New saddle thickness changes the fit.
- Clamp bolts under-torqued18%
Saddle slips down mid-ride.
- Clamped outside the rail markings12%
Risk of rail failure.
- Rail type mismatch5%
Carbon rails in a round clamp.
Afterwards
Check the bolts again after the first ride — clamps settle, and saddle clamp torque is one of the items on the checklist in tuning up a bike. If the new saddle is comfortable but the position feels off, work through adjusting bike seat height in small steps rather than changing several things at once.
Frequently asked questions
Are all bike seats interchangeable?
Mostly. Standard round 7 mm rails fit essentially every clamp. Oval or carbon rails need a compatible clamp, and some bikes with proprietary integrated seatposts need specific saddles or an adapter.
How tight should saddle clamp bolts be?
Usually 5 to 8 Nm — check your seatpost. On twin-bolt clamps, alternate between the bolts so the cradle tightens evenly. Do not simply keep tightening a slipping saddle, especially on carbon.
Do I need to reset my saddle height after changing the seat?
Yes. Saddles differ in thickness, so matching the old seatpost insertion depth will not reproduce your fit. Measure to the top of the new saddle instead.
Where on the rails should the clamp sit?
Only within the marked section, usually the straight part of the rail. Clamping outside those marks puts a bending load on the rail that it was not designed for and can cause it to fail.
Sources
- Saddles — Sheldon Brown
Supports: Saddle rail standards, clamp styles, and setting height, tilt and setback after a change.
- Effects of Bicycle Saddle Height on Knee Injury Risk and Cycling Performance — Sports Medicine · DOI 10.2165/11588740-000000000-00000
Supports: That saddle height materially affects knee loading, so a change in saddle thickness changes the fit.