How to Adjust Bike Seat Height
By Cal WhitmoreUpdated 8 min read
The short answer
Put your heel on the pedal at its lowest point while seated normally: your leg should be completely straight. That leaves the right knee bend when you pedal properly. Never raise the post past its insertion mark.
Key takeaways
- Too low is the most common error, and it is the one that hurts knees. Most people ride lower than they should.
- Change height in 5 mm steps and ride between changes. Small differences are genuinely noticeable.
- The minimum insertion line on the seatpost is a structural limit, not a suggestion.
- Height, fore-aft and tilt are three separate adjustments. Set them in that order.
Saddle height is the single adjustment that most affects how a bike feels, how efficiently you pedal and whether your knees complain. It is also the one most people never touch after buying the bike, usually leaving it several centimetres too low because a low saddle feels safer at a standstill.
Why too low is the common mistake
A saddle set too low keeps the knee heavily bent throughout the pedal stroke. That increases the compressive load across the front of the knee, and it means you never get to extend the leg and use the strongest part of your range. Riders who find that cycling hurts their knees very often just need the saddle raised.
| What you notice | Likely cause |
|---|---|
| Pain at the front of the knee | Saddle too low, or too far forward |
| Pain behind the knee | Saddle too high, or too far back |
| Rocking hips side to side | Saddle too high — you are reaching for the pedals |
| Toes pointing down to reach the bottom | Saddle too high |
| Legs tire fast, feel cramped | Saddle too low |
| Sliding forward off the nose | Saddle tilted nose-down |
| Numbness or pressure | Saddle tilted nose-up, or wrong saddle width |
Two ways to find your height
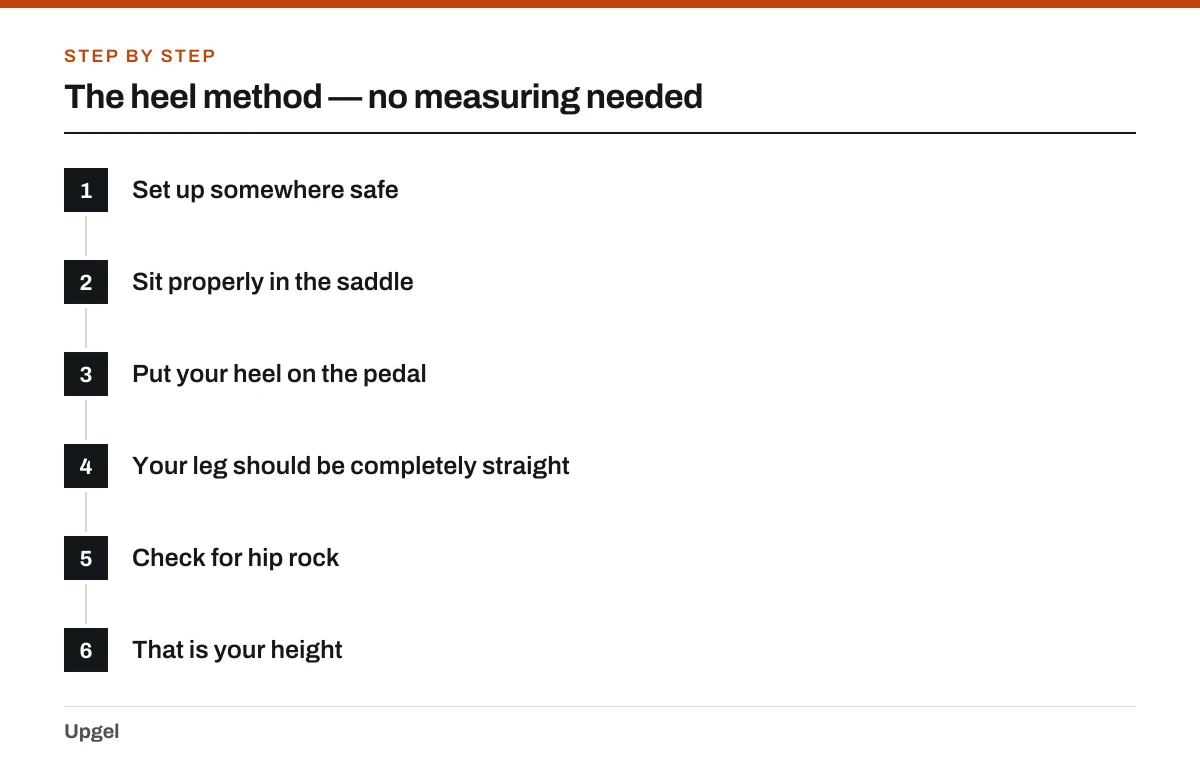
The heel method — no measuring needed
Set up somewhere safe
Next to a wall or in a doorway you can hold, or with someone steadying the bike. You need to be sitting normally, not tiptoeing.
Sit properly in the saddle
Square in your normal riding position, not perched forward.
Put your heel on the pedal
With that pedal at the very bottom of the stroke, in line with the seat tube.
Your leg should be completely straight
Straight, but not stretching, and your hips should stay level.
Check for hip rock
Backpedal slowly with your heel on the pedal. If your hips rock side to side, the saddle is too high. Lower it 5 mm and check again.
That is your height
When you move to pedalling normally with the ball of your foot, this leaves the 25–35 degrees of knee bend you actually want.
Making the adjustment
Changing the height
Mark where you are now
A wrap of tape or a pencil line on the seatpost. If the change turns out worse, you can go straight back.
Loosen the seatpost clamp
Either a quick-release lever or a bolt, usually 4, 5 or 6 mm Allen. One or two turns is enough; do not remove it.
Twist as you move it
A gentle twist breaks any corrosion and stops the post binding. If it will not move at all, the post is seized — stop and treat that as its own job rather than forcing it.
Move in 5 mm steps
Small. Saddle height differences of a few millimetres are genuinely perceptible, and large jumps make it hard to tell what improved.
Check the minimum insertion mark
Every seatpost has a line stamped near the bottom. That mark must stay inside the frame. Always.
Align the saddle straight
Sight from behind: the saddle should line up with the top tube.
Tighten to torque
Typically 5–7 Nm on an alloy frame, and often as low as 4–5 Nm on carbon. Over-tightening a seat clamp crushes posts and cracks frames.
Ride it before judging
Give a new position a couple of rides. Anything different feels wrong at first.
Fore-aft position and tilt
Height is the big one, but it is not the only one, and the three interact — change the height and the effective reach changes too.
- Fore-aft is set by sliding the saddle along its rails. The traditional starting point is the KOPS check: with the cranks horizontal, a plumb line from the front of your forward kneecap falls roughly through the pedal axle. Treat it as a starting point, not a rule.
- Tilt should be level for most riders. Put a spirit level or a phone level along the saddle. A small nose-down tilt suits some people; a large one just slides you forward and loads your hands.
- Adjust height first, then fore-aft, then tilt, and re-check height afterwards.
- Saddle rails have their own minimum and maximum clamping marks. Do not clamp outside them.
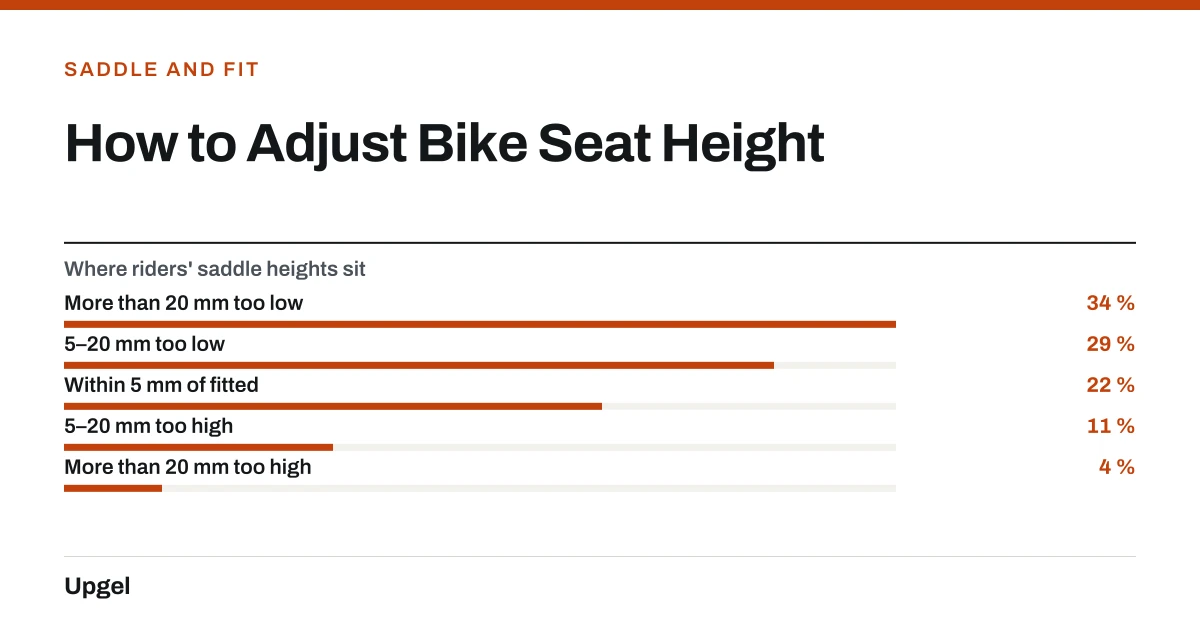
- More than 20 mm too low34%
Most common. Loads the front of the knee.
- 5–20 mm too low29%
Feels safe, costs power.
- Within 5 mm of fitted22%
About right.
- 5–20 mm too high11%
Hip rock, pain behind the knee.
- More than 20 mm too high4%
Reaching for the pedals.
After you change it
Give any new position two or three rides before deciding. If a change makes something hurt, go back to your marked position and try a smaller step. Persistent pain that does not resolve with small adjustments is worth a professional bike fit — it is not an expensive service relative to knee physiotherapy.
Saddle height and seatpost clamp torque both appear in the routine check in tuning up a bike. If the saddle itself is the problem rather than its position, that is a different question — see why bike seats are uncomfortable. To swap the saddle entirely, changing a bike seat covers the rail clamp.
Frequently asked questions
How high should my bike seat be?
Put your heel on the pedal at its lowest point while seated normally — your leg should be completely straight without your hips rocking. As a starting number, saddle height is roughly 109% of your inseam.
Is my bike seat too low?
Probably, if you have never adjusted it. Signs include pain at the front of the knee, legs tiring quickly, and feeling cramped. Most riders leave the saddle lower than fits them.
How do I know if my bike seat is too high?
Your hips rock side to side as you pedal, you point your toes to reach the bottom of the stroke, or you get pain behind the knee. Lower it 5 mm at a time.
How far can I raise my seatpost?
Never past the minimum insertion mark stamped on the post — that must stay inside the frame. If you need more height, fit a longer seatpost rather than exceeding the mark.
Sources
- Saddles — Sheldon Brown
Supports: Saddle height, fore-aft and tilt adjustment, and the interaction between them.
- Effects of Bicycle Saddle Height on Knee Injury Risk and Cycling Performance — Sports Medicine · DOI 10.2165/11588740-000000000-00000
Supports: That saddle height affects knee joint loading and is linked to overuse knee injury risk in cyclists.
- Bicycle Glossary — Sheldon Brown
Supports: Seatpost terminology and the role of minimum insertion depth.